Nuxt3とmicroCMSで作るブログシリーズの4番目の記事です。
今回は記事一覧ページにページング処理を施していきます。
ページングの行い方
基本的にmicroCMSさんの公式ブログで紹介しているやり方を参考にしています。
microCMSの一覧GET APIにはlimitとoffsetプロパティがあります。
limitはリクエスト時の取得件数の設定を、offsetは何件目から取得するか、という設定を行えます。
例えば記事が10個あって、一回の取得件数、つまりlimitを3に設定しているとします。
このとき、クライアントが2ページ目にアクセスしてきたときはlimitを3,offsetを3にしてGETリクエストを送ると4~6件目の記事が取得できます。
なので、offsetの計算としては(ページ数-1) * 3となります。
何ページ目まで表示させるかは記事の件数をlimitで割ればできそうです。
routeの追加
まずはユーザーが何ページ目にアクセスしているか、ということを示すルートを作成します。
/page/2だったら2ページ目という感じです。
pagesディレクトリにpageディレクトリを作成し、その中に[id].vueを作成します。
<!-- src/pages/page/[id].vue -->
<script setup lang="ts">
import { MicroCMSQueries } from 'microcms-js-sdk';

const route = useRoute()
const page = Number(route.params.id || 1)
const limit = 2
const queries: MicroCMSQueries = {
    limit: limit,
    offset: (page - 1) * limit,
}

const { data: posts } = await useFetch('/api/postList', { params: queries })

const numPages = Math.ceil(posts.value.totalCount / limit)

</script>

<template>
    <div>
        <div class="divider">
            <section class="container">
                <!-- 記事一覧 -->
                <PostList :posts="posts.contents" />
            </section>
            <aside class="aside">
                <!-- キーワード検索、タグ一覧 -->
            </aside>
        </div>
    </div>
</template>

<style scoped>
@media (min-width: 1160px) {
    .divider {
        display: flex;
        justify-content: space-between;
        width: 1080px;
        margin: 20px auto 0;
        padding-top: 84px;
    }

    .container {
        width: 600px;
    }

    .aside {
        width: 300px;
    }
}

@media (min-width: 820px) and (max-width: 1160px) {
    .divider {
        margin: 20px auto 0;
        width: 740px;
        padding-top: 112px;
    }

    .aside {
        margin-top: 60px;
    }
}


@media (max-width: 820px) {
    .divider {
        margin: 20px 0 0;
        padding: 0 20px;
        padding-top: 112px;
    }

    .aside {
        margin-top: 60px;
        width: 100%;
    }
}
</style>
urlからページ数を取得して、offsetとページ数を計算しています。
記事一覧のAPIの編集
次に受け取ったパラメーターを元に、返却する記事を変更するようにしていきます。
// src/server/api/postList.ts
import client from './client'
import { Post } from '../../types/blog'

export default defineEventHandler(async (event) => {
    const queries = getQuery(event)
    const data = await client
        .getList<Post>({
            endpoint: 'post',
            queries: queries
        })
    return data
})
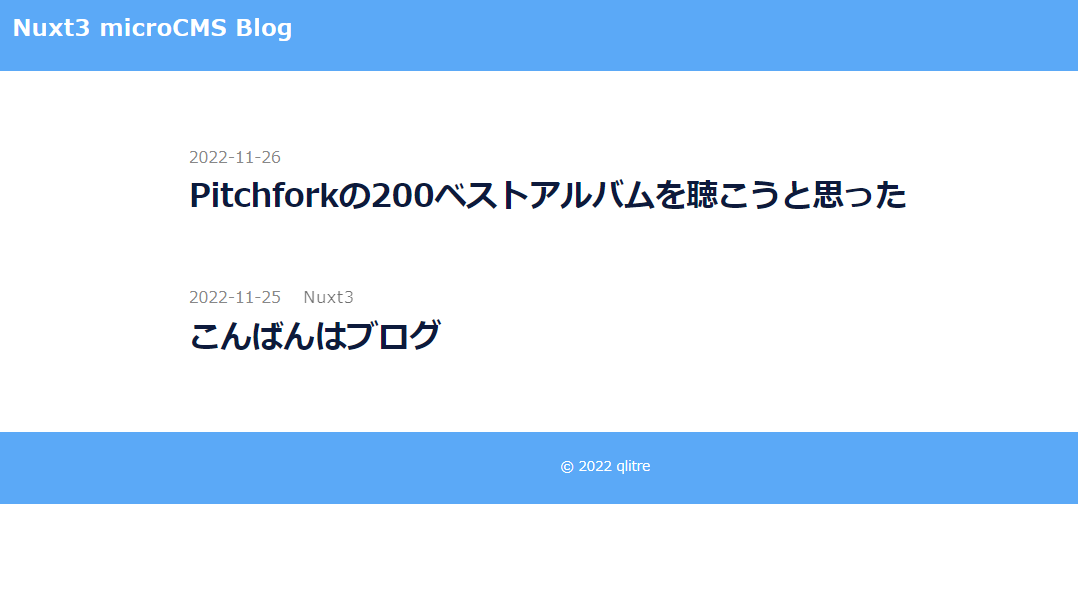
ここまででyarn devしてURLに応じてページが切り替わることを確認してみましょう。
http://localhost:3000/page/1
http://localhost:3000/page/2
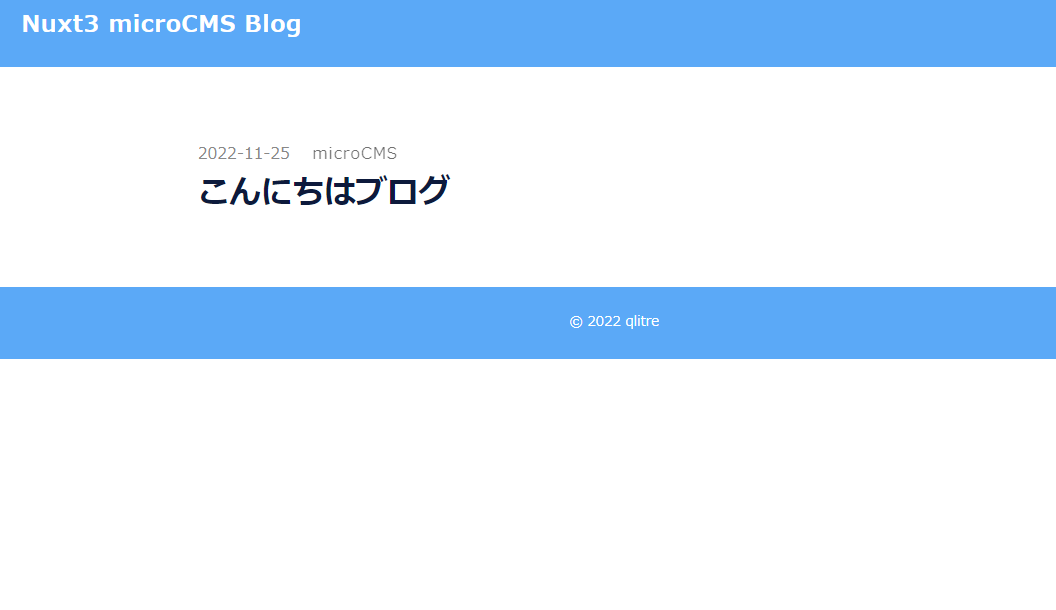
このように返却されるページが変わりました。
Homeコンポーネントで共通化する
作成したpages/page/[id].vueはほとんどpage/index.vueと同じです。
なので、この段階でHomeコンポーネントを作成し、処理をまとめておきましょう。
components/Home.vueを作成し、以下のようにします。
<!-- src/components.Home.vue -->
<script setup lang="ts">
import { MicroCMSQueries } from 'microcms-js-sdk';

type Props = {
    page: number,
}

const { page } = defineProps<Props>()

const limit = 2
const queries: MicroCMSQueries = {
    limit: limit,
    offset: (page - 1) * limit,
}

const { data: posts } = await useFetch('/api/postList', { params: queries })

const numPages = Math.ceil(posts.value.totalCount / limit)

</script>

<template>
    <div>
        <div class="divider">
            <section class="container">
                <!-- 記事一覧 -->
                <PostList :posts="posts.contents" />
            </section>
            <aside class="aside">
                <!-- キーワード検索、タグ一覧 -->
            </aside>
        </div>
    </div>
</template>

<style scoped>
@media (min-width: 1160px) {
    .divider {
        display: flex;
        justify-content: space-between;
        width: 1080px;
        margin: 20px auto 0;
        padding-top: 84px;
    }

    .container {
        width: 600px;
    }

    .aside {
        width: 300px;
    }
}

@media (min-width: 820px) and (max-width: 1160px) {
    .divider {
        margin: 20px auto 0;
        width: 740px;
        padding-top: 112px;
    }

    .aside {
        margin-top: 60px;
    }
}


@media (max-width: 820px) {
    .divider {
        margin: 20px 0 0;
        padding: 0 20px;
        padding-top: 112px;
    }

    .aside {
        margin-top: 60px;
        width: 100%;
    }
}
</style>
page変数を親から受け取り、基本的には今まで作ってきたページをコピペしています。
あとはindex.vueとpage/[id].vueからHome.vueを呼び出します。
<!-- src/pages/index.vue -->
<template>
    <Home :page="1" />
</template>
<!-- src/pages/page/[id].vue -->
<script setup lang="ts">

const route = useRoute()
const page = Number(route.params.id || 1)

</script>

<template>
    <Home :page="page" />
</template>
ついでに現在はlimitを2としていますが、こういう変数は共通化して呼び出すようにしましょう。
そうしておくと後で変更する際に迷わなくて良いです。
srcディレクトリにsettings,siteSettings.tsを作成します。
/* src/settings/siteSettings.ts */

// Blogの1ページあたりの記事数
export const BLOG_PER_PAGE = 2
後はHomeコンポーネントを置き換えます。
<script setup lang="ts">
import { MicroCMSQueries } from 'microcms-js-sdk';
import { BLOG_PER_PAGE } from '../settings/siteSettings';
// 省略...
const limit = BLOG_PER_PAGE
// 省略...

</script>
ページネーションコンポーネント
次にPagination.vueをコンポートとして作ります。
受け取る値はトータルのページ数と、現在表示しているページナンバーです。
<!-- src/components/Pagination.vue -->
<script setup lang="ts">

type Props = {
    numPages: number;
    current: number;
}

const { numPages, current } = defineProps<Props>();

// ページリンクを返す
function getPath(p: number) {
    return `/page/${p}`
}

// クラスを返す
// 現在のページの場合スタイルをかえるため
function getClass(page: number, current: number) {
    if (page == current) return 'current'
    return 'link'
}

</script>

<template>
    <div class="pagination">
        <NuxtLink v-for="page in numPages" :key="page" :class="getClass(page, current)" :to="getPath(page)">
            {{ page }}
        </NuxtLink>
    </div>
</template>

<style scoped>
.pagination {
    position: relative;
    width: 100%;
    margin: 8em 0 8rem;
    font-family: 'Open Sans', sans-serif;
    font-weight: 300;
    line-height: 1.1;
    text-align: center;
    vertical-align: middle;
}

.current,
.link {
    display: inline-block;
    margin: 0 2rem;
    padding: 2px 0;
    text-align: center;
    font-size: 3rem;
    font-weight: lighter;
}

.current {
    color: #000;
}

.link {
    color: #A2A2A6;
}
</style>
ここの部分でv-forループ中のページナンバーから、遷移先のリンクと、クラスを取得するようにしています。
// ページリンクを返す
function getPath(p: number) {
    return `/page/${p}`
}

// クラスを返す
// 現在のページの場合スタイルをかえるため
function getClass(page: number, current: number) {
    if (page == current) return 'current'
    return 'link'
}
次に親コンポーネントから現在ページ数と、総ページ数を渡して呼び出しましょう。
<!-- src/components/Home.vue -->
<template>
    <div>
        <div class="divider">
            <section class="container">
                <!-- 記事一覧 -->
                <PostList :posts="posts.contents" />
            </section>
            <aside class="aside">
                <!-- キーワード検索、タグ一覧 -->
            </aside>
        </div>
        <!-- 追加 -->
        <Pagination :numPages="numPages" :current="page" />
    </div>
</template>
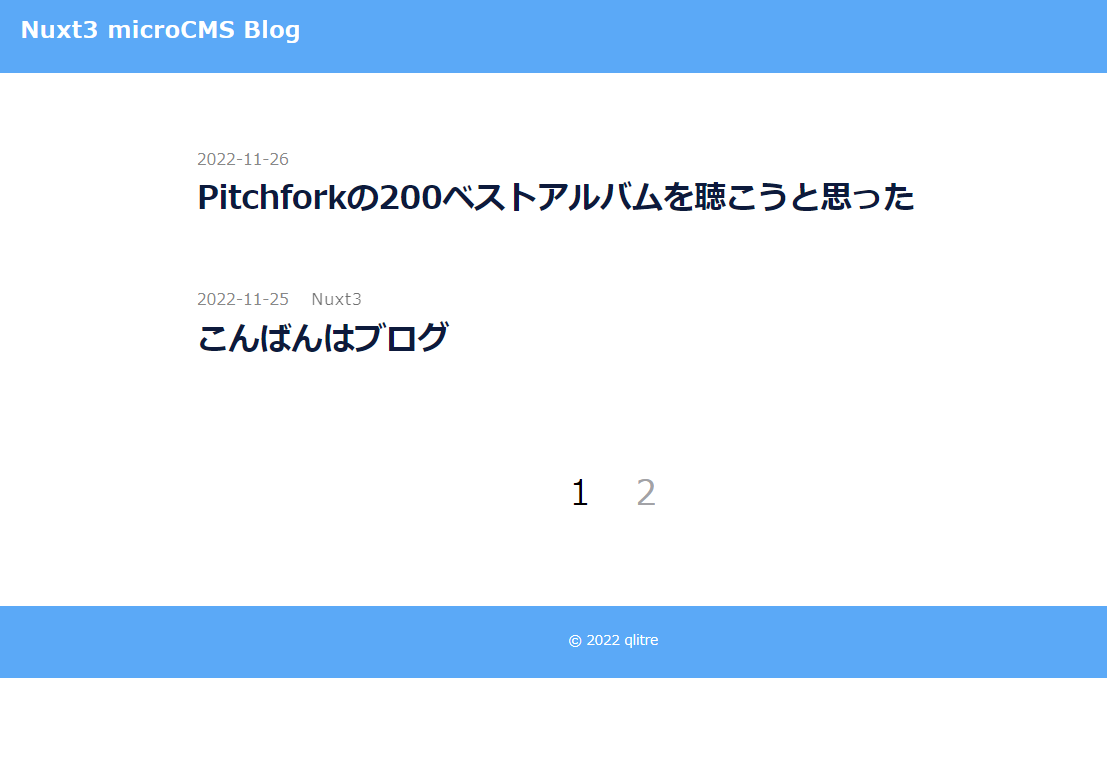
このようにページネーションが表示されます。
次回はキーワード検索を実装していきます。
 Share
Share