Python DjangoとMDBで作る株取引ノートシリーズの3つ目の記事です。
前回ベーステンプレートを作成してトップページを作りました。
今回はトップページに取引一覧を表示する処理を実装していきます。
HTMLの編集
まずcomponentsディレクトリにtransaction_table.htmlを作成し、以下のようにします。
<!-- note/templates/note/components/transaction_table.html -->

<table class="table mt-4">
  <thead>
    <tr>
      <th scope="col">#</th>
      <th scope="col">DateEntry</th>
      <th scope="col">DateClose</th>
      <th scope="col">Code</th>
      <th scope="col">Name</th>
      <th scope="col">Status</th>
      <th scope="col">Results</th>
      <th scope="col">Benefit</th>
    </tr>
  </thead>
  <tbody>
    {% for t in transaction_list  %}
    <tr>
      <th>{{ t.pk }}</th>
      <th>{{ t.date_entry | date:'Y-m-d' }}</th>
      <th>{{ t.date_close | date:'Y-m-d' }}</th>
      <th>{{ t.ticker_code }}</th>
      <th>{{ t.ticker_name }}</th>
      <th>
        <span class="badge bg-{{t.status.color}} ls-widest">{{ t.status.name }}</span>
      </th>
      <th>
        <span class="badge bg-{{t.result.color}} ls-widest">{{ t.result.name }}</span>
      </th>
      <th>
        {% if t.benefit > 0 %}
          <span class="text-success">+{{ t.benefit }}</span>
        {% elif t.benefit < 0 %}
          <span class="text-danger">{{ t.benefit }}</span>
        {% else %}
          {{ t.benefit }}
        {% endif %}
      </th>
    </tr>
    {% endfor %}
  </tbody>
</table>
statusとresultモデルのcolorにはbootstrapのテーマカラーを設定していました。
なので、例えばinfo としていたら
<span class="badge bg-info ls-widest">{{ t.result.name }}</span>
という風になって、bootstrapのテーマカラーが適用される仕組みです。
次にindex.htmlでこのhtmlファイルを読み込みます。
<!-- note/templates/note/index.html -->

{% extends "note/base.html" %}
{% block content %}

{% include "note/components/transaction_table.html" %}

{% endblock %}
データを追加してみる
次に管理サイトからデータをいくつか追加してみましょう。
売買履歴モデルのHistoryは入力せずTransactionモデルのみに入力していきます。
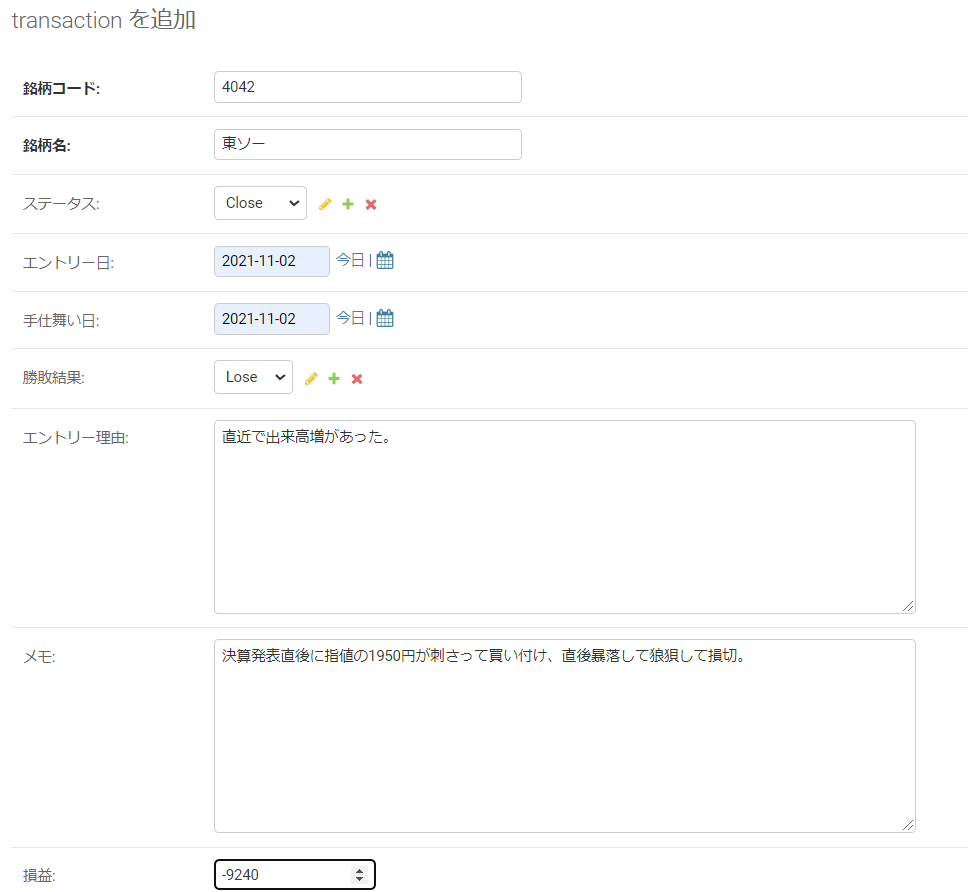
このように入力をしていきます。
損失はマイナスの数値をいれます。
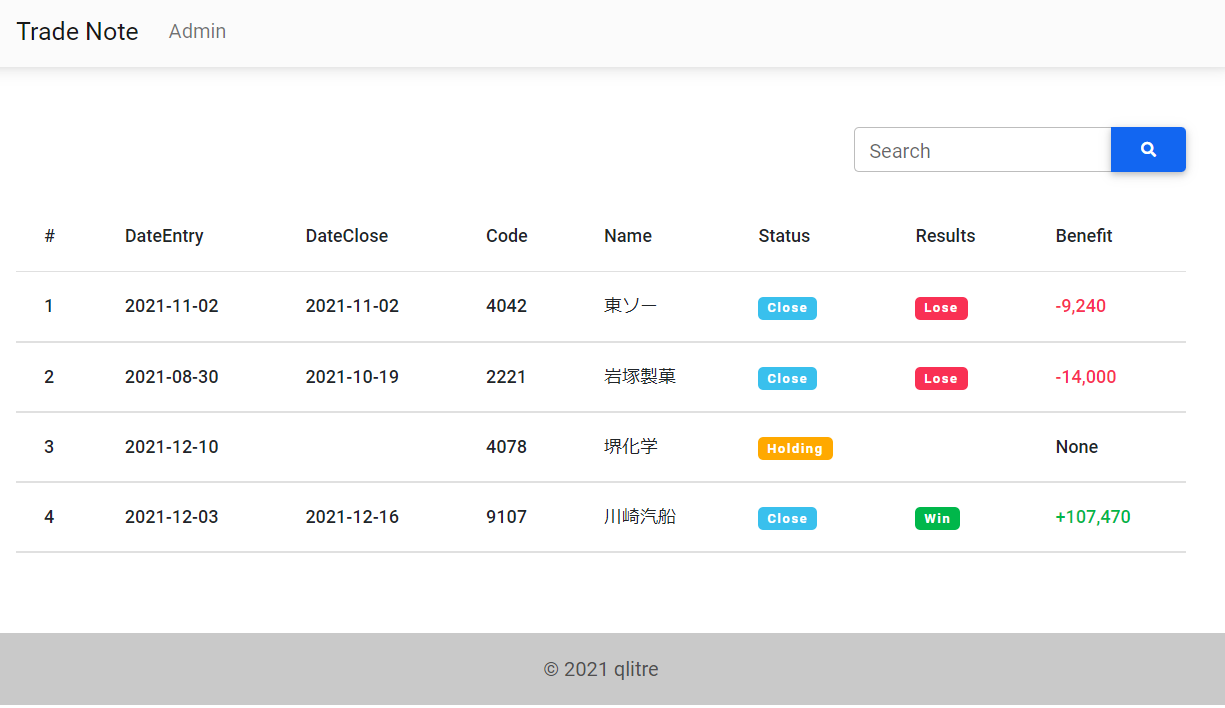
他にもいくつか追加しますと、このような表示になります。

現状登録した順に並んでいるだけです。
使いやすくするようにカスタマイズをしていきます。
数字をカンマ区切りする
損益を表すBenefit列は見やすいように3桁でカンマ区切りをするようにしましょう。
これはdjangoの組み込みフィルタで簡単に実装できます。
まずsettings.pyを以下のように追記します。
# project/settings.py

...

INSTALLED_APPS = [
    'django.contrib.admin',
    'django.contrib.auth',
    'django.contrib.contenttypes',
    'django.contrib.sessions',
    'django.contrib.messages',
    'django.contrib.staticfiles',
    'note.apps.NoteConfig',
    'django.contrib.humanize',  # 追加
]

...

NUMBER_GROUPING = 3 # 追加
そしてtransaction_table.htmlを以下のようにします。
<!-- note/templates/note/components/transaction_table.html -->

<!-- 追加 -->
{% load humanize %}

<table class="table mt-4">
  <thead>
    <tr>
     ...
    </tr>
  </thead>
  <tbody>
    {% for t in transaction_list  %}
    <tr>
      ...
      <!-- 変更 intcommaをつける -->
      <th>
        {% if t.benefit > 0 %}
          <span class="text-success">+{{ t.benefit|intcomma }}</span>
        {% elif t.benefit < 0 %}
          <span class="text-danger">{{ t.benefit|intcomma }}</span>
        {% else %}
          {{ t.benefit|intcomma }}
        {% endif %}
      </th>
    </tr>
    {% endfor %}
  </tbody>
</table>
これでカンマ区切りで表示されます。
検索機能の実装
次に簡単な検索機能を実装させていきます。
あまり複雑なことをやらずにキーワード検索のみの実装することとします。
まずnoteディレクトリにforms.pyを作成します。
# note/forms.py
from django import forms


class TransactionSearchForm(forms.Form):
    """取引検索フォーム。"""
    key_word = forms.CharField(
        label='検索キーワード',
        required=False,
        widget=forms.TextInput(attrs={'autocomplete': 'off',
                                      'class': 'form-control',
                                      })
    )
次にviews.pyを以下のようにします。
# note/views.py
from django.views import generic
from .models import Transaction
from .forms import TransactionSearchForm  # 追加
from django.db.models import Q  # 追加


class TransactionList(generic.ListView):
    model = Transaction
    template_name = 'note/index.html'

    def get_context_data(self, **kwargs):
        context = super().get_context_data(**kwargs)
        context['search_form'] = TransactionSearchForm
        return context

    def get_queryset(self):
        queryset = super().get_queryset()
        self.form = form = TransactionSearchForm(self.request.GET or None)
        if form.is_valid():
            key_word = form.cleaned_data.get('key_word')
            if key_word:
                # 銘柄コード、銘柄名、エントリー理由、メモが対象
                for word in key_word.split():
                    queryset = queryset.filter(
                        Q(ticker_code__icontains=word) |
                        Q(ticker_name__icontains=word) |
                        Q(reason__icontains=word) |
                        Q(memo__icontains=word)
                    )

        return queryset
QオブジェクトはクエリのOR検索を簡単にしてくれます。
queryset = queryset.filter(
  Q(ticker_code__icontains=word) |
  Q(ticker_name__icontains=word) |
  Q(reason__icontains=word) |
  Q(memo__icontains=word)
)
ここの部分で、銘柄コード、銘柄名、エントリー理由、メモそれぞれに対して、OR検索を実装しています。
viewの編集が終わったらcomponents内にsearch_form.htmlを作成します。
<!-- note/templates/note/components/search_form.html -->

<div class="d-flex justify-content-end">
  <form method="get">
    <div class="input-group">
      <div class="form-outline">
        {{ search_form.key_word }}
        <label class="form-label" for="id_key_word">Search</label>
      </div>
      <button type="submit" class="btn btn-primary">
        <i class="fas fa-search"></i>
      </button>
    </div>
  </form>
</div>
次にindex.htmlでhtmlファイルを読み込みます。
<!-- note/templates/note/index.html -->

{% extends "note/base.html" %}
{% block content %}

<!-- 追加 -->
{% include "note/components/search_form.html" %}

{% include "note/components/transaction_table.html" %}

{% endblock %}
このように検索フォームが表示されます。
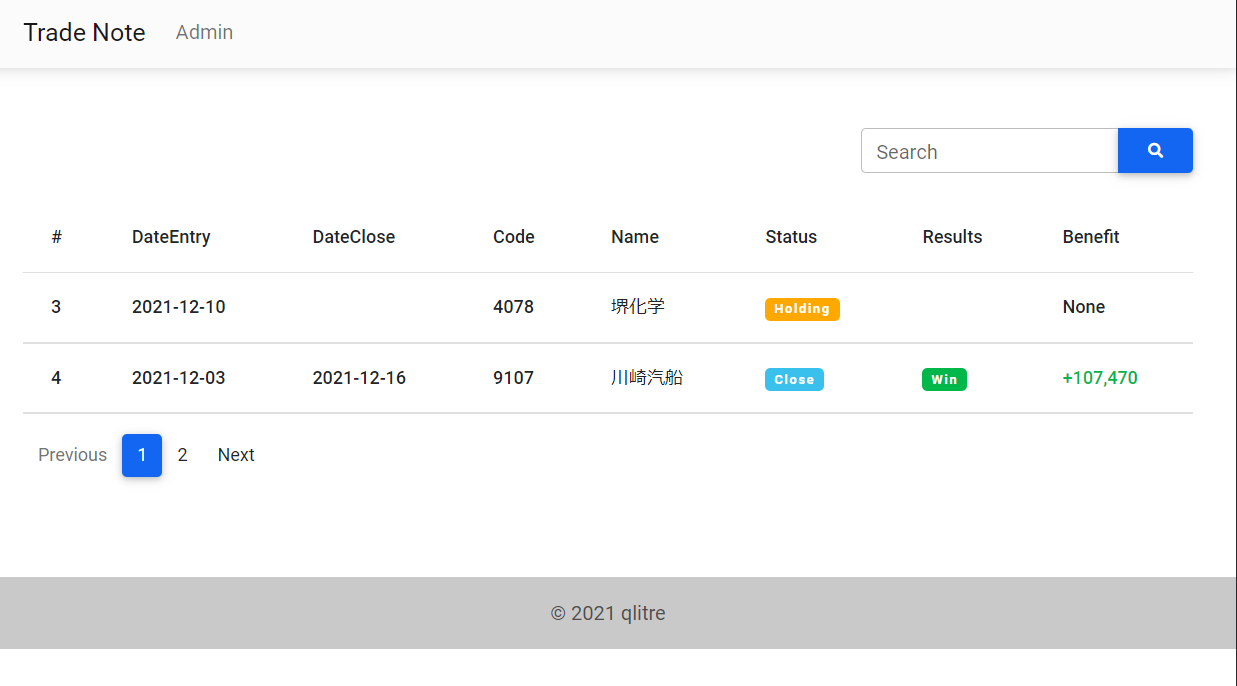
ページネーションの表示
取引が多くなった時のために、ページネーションを実装していきます。
まずURLパラメーターを変換するテンプレートタグを自作します。
noteディレクトリ内にtemplatetags→note.pyと作成して以下のようにします。
# note/templatetags/note.py
from django import template

register = template.Library()

@register.simple_tag
def url_replace(request, field, value):
    """GETパラメータの一部を置き換える。"""
    url_dict = request.GET.copy()
    url_dict[field] = str(value)
    return url_dict.urlencode()
ページネーションの機能は普通に実装すると、http://yourdomain?page=2という風にページ送りがされます。
でも先ほど検索機能を実装したので、例えばhogeと検索していた場合はhttp://yourdomain?keyword=hogeというようなURLになります。
既に何らかのクエリが投げられていて、且つページ送りをする場合はhttp://yourdomain?keyword=hoge&page=2という風にしたいです。
そのあたりのURLを動的に作るのがこのフィルタになります。
次にviews.pyに追記をします。
class TransactionList(generic.ListView):
    model = Transaction
    template_name = 'note/index.html'
    # 日付を降順で並び変えた後に、ステータスで並び替える
    ordering = ('status', '-date_close')
    # テスト動作のため2にしています。
    paginate_by = 2
orderingの部分は好みによると思うのですが、私はstatusがholdingのものが常に上位、次にクローズした日が新しい順に並ぶようにしています。
orderingは複数指定ができて、後ろから順番に並び変えられるようになっています。
この場合は、日付を降順で並び替えた後に、status順に並び変えていることになります。
statusのコンテンツはholdingとcloseしかないですが、holdingを先に登録していたので、昇順並び替えです。
もし逆順に登録していたら以下のようにします。
ordering = ('-status', '-date_close')
view側でやることはこれ以上はなくて、後はListViewの機能でcontextにページネーション実装に必要な変数を渡してくれます。
components内にpagination.htmlを作成します。
ここで先ほど作成したテンプレートフィルターを使用しますので、最初に{% load note %}とするのを忘れないようにしましょう。
<!-- note/templates/note/components/pagination.html -->

{% load note %}

<nav>
  <ul class="pagination">
    <!-- 前ページのリンク -->
    {% if page_obj.has_previous %}
      <li class="page-item">
        <a class="page-link" href="?{% url_replace request 'page' page_obj.previous_page_number %}">Previous</a>
      </li>
    {% else %}
      <li class="page-item disabled">
        <p class="page-link">Previous</p>
      </li>
    {% endif %}

    <!-- 数字の繰り返し部分 -->
    {% for num in page_obj.paginator.page_range %}
      {% if page_obj.number == num %}
        <li class="page-item active"><a class="page-link" href="#!">{{ num }}</a></li>
      {% else %}
        <li class="page-item"><a class="page-link" href="?{%  url_replace request 'page' num %}">{{ num }}</a></li>
      {% endif %}
    {% endfor %}

    <!-- 前ページのリンク -->
    {% if page_obj.has_next %}
      <li class="page-item">
        <a class="page-link" href="?{% url_replace request 'page' page_obj.next_page_number %}">Next</a>
      </li>
    {% else %}
      <li class="page-item disabled">
        <p class="page-link">Next</p>
      </li>
    {% endif %}
  </ul>
</nav>
次にお決まりでindex.htmlで読み込みます。
<!-- note/templates/note/index.html -->

{% extends "note/base.html" %}
{% block content %}

{% include "note/components/search_form.html" %}

{% include "note/components/transaction_table.html" %}

<!-- 追加 -->
{% include "note/components/pagination.html" %}

{% endblock %}
このように表示がされます。
次回は取引詳細ページを作成する予定です。
 Share
Share