Python DjangoとMDBで作る株取引ノートシリーズの4つ目の記事です。
前回は取引一覧ページを作りました。
今回は取引の詳細ページを作成していきます。
詳細ページの作成
お決まりでurls.pyとviewに追記をしていきましょう。
# note/urls.py

from django.urls import path
from . import views

app_name = 'note'

urlpatterns = [
    path('', views.TransactionList.as_view(), name='transaction_list'),
    path('detail/<int:pk>/', views.TransactionDetail.as_view(), name='detail'),  # 追加
]
# note/views.py

# 追加
class TransactionDetail(generic.DetailView):
    model = Transaction
    template_name = 'note/detail.html'
次にhtmlを作成していきます。
今回は売買履歴を表すHistoryモデルを作成していました。
この詳細ページの中で売買履歴を表示するようにしましょう。
まずはcomponentsディレクトリ内にhistory_table.htmlを作成します。
<!-- note/templates/note/components/history_table.html -->
{% load humanize %}

<table class="table">
  <thead>
    <tr>
      <th scope="col">Date</th>
      <th scope="col">Category</th>
      <th scope="col">Price</th>
      <th scope="col">Quantity</th>
      <th scope="col">Commission</th>
      <th scope="col">Ammount</th>
    </tr>
  </thead>
  <tbody>
    {% for history in transaction.history_set.all|dictsort:"date_trade"  %}
    <tr>
      <th>{{ history.date_trade|date:'Y-m-d' }}</th>
      <th>{{ history.trading_category }}</th>
      <th>{{ history.price|intcomma }}</th>
      <th>{{ history.quantity|intcomma }}</th>
      <th>{{ history.commission|intcomma }}</th>
      <th>{{ history.amount|intcomma }}</th>
    </tr>
    {% endfor %}
  </tbody>
</table>
今回はHistoryモデルのtargetにTransactionモデルを外部キーとして設定していました。
このようにしているとテンプレート内で以下のようにして、Transactionモデルに紐づくHistoryモデルの一覧を書き出すことができます。
{% for history in transaction.history_set.all|dictsort:"date_trade" %}
dictsort:"date_trade" の部分はDjangoの組み込みフィルタで、テンプレート内のfor文内で昇順に並び変えることができます。
この場合はdate_trade、つまり取引日で昇順に並び替えた状態で出力されることになります。
次にこのコンポーネントを読み込む形でdetail.htmlを作成します。
<!-- note/templates/note/detail.html -->
{% extends "note/base.html" %}
{% block content %}
<h4>#{{transaction.pk}}</h4>
<h1 class="mt-2">
  {{ transaction.ticker_code }} {{ transaction.ticker_name }}
</h1>
<h4 class="mt-4">Reason</h4>
<p class="mt-2">{{ transaction.reason|linebreaks }}</p>
<h4 class="mt-4">Memo</h4>
<hr>
{{ transaction.memo|linebreaks }}
<hr>
<h4 class="text-center mt-2">History</h4>
{% include "note/components/history_table.html" %}
{% endblock %}
トップページの取引テーブルからリンクで飛べるようにしておきましょう。
<!-- note/templates/note/components/transaction_table.html -->
{% load humanize %}
<table class="table mt-4">
  <thead>
    <tr>
      ...
    </tr>
  </thead>
  <tbody>
    {% for t in transaction_list  %}
    <tr>
      ...
      <!-- 追記 -->
      <th><a href="{% url 'note:detail' t.pk %}">{{ t.ticker_name }}</a></th>
      ...
    </tr>
    {% endfor %}
  </tbody>
</table>
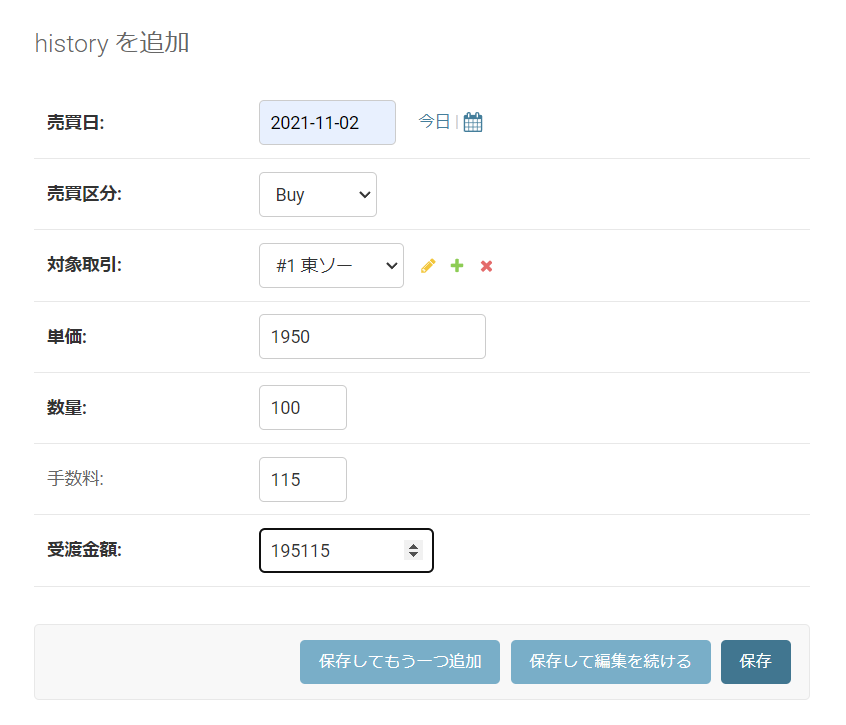
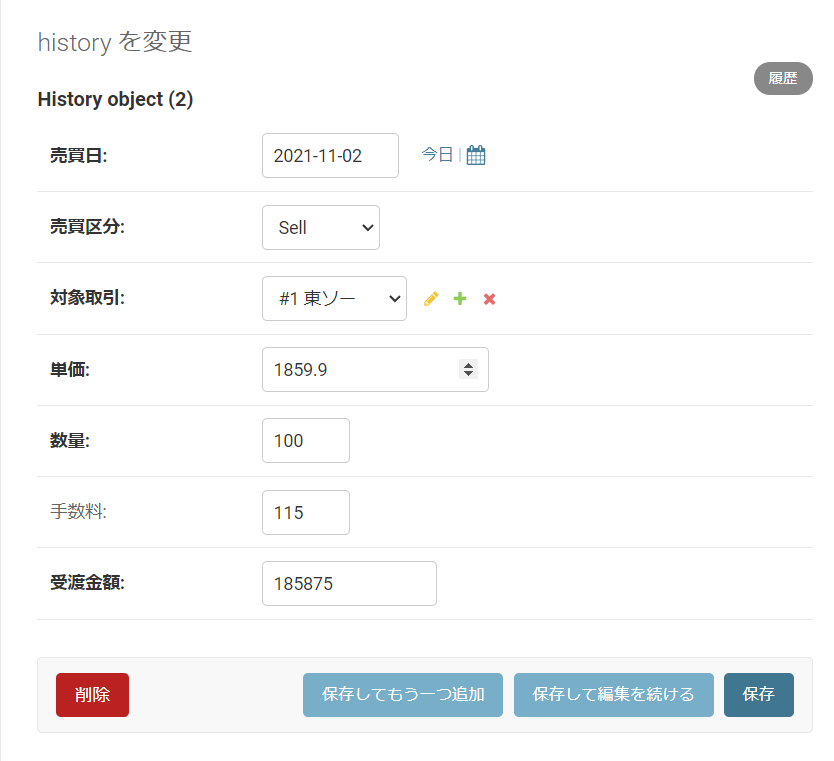
次に管理サイトからHistoryモデルにデータを追加してみます。
売り買いも正の値を入れる形です。
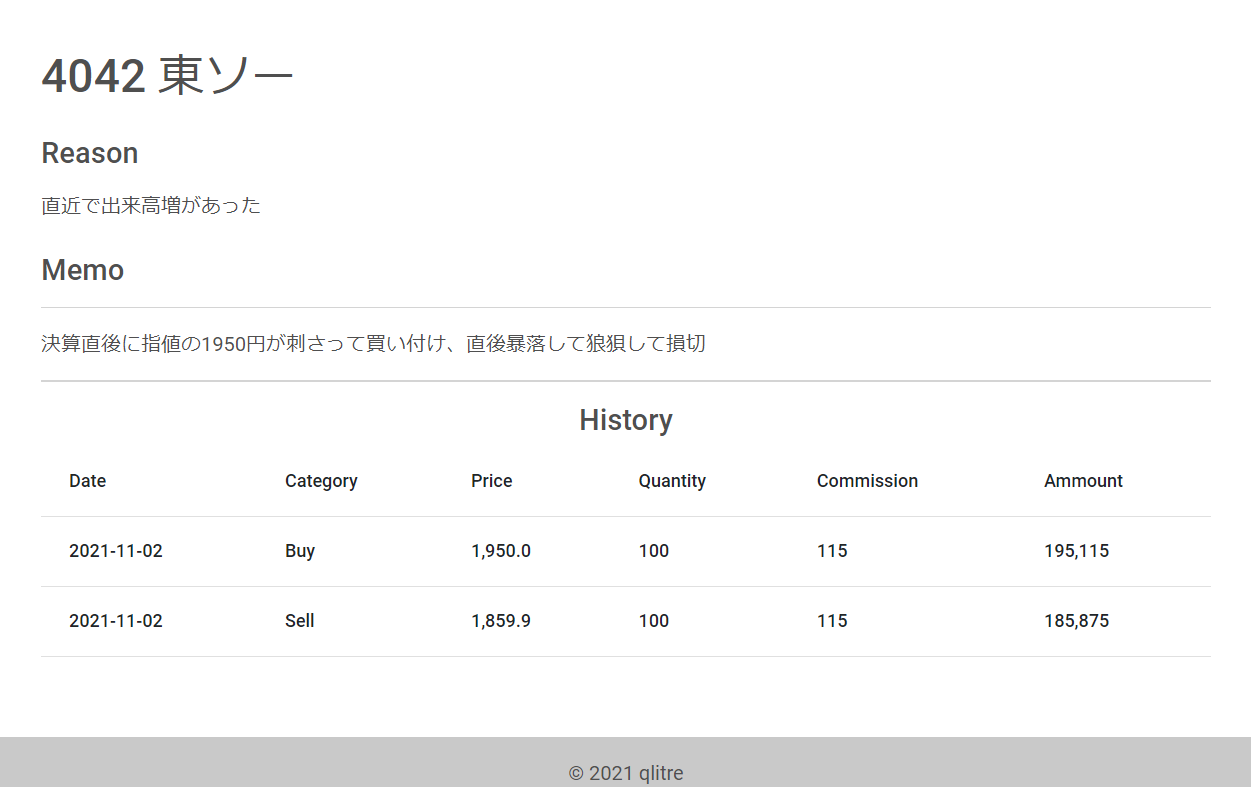
詳細ページではこのようになります。
パンくずリストの作成
実際に使用する際にパンくずリストがあると便利です。
MDBを使ってページに表示するには以下のようにします。
<!-- note/templates/note/detail.html -->

{% extends "note/base.html" %}
{% block content %}
<!-- 追加 -->
<nav aria-label="breadcrumb">
  <ol class="breadcrumb">
    <li class="breadcrumb-item">
      <a href="/">
        <i class="fa fa-home"></i>
        Home
      </a>
    </li>
    <li class="breadcrumb-item active" aria-current="page">
      #{{ transaction.pk }} {{ transaction.ticker_code }} {{ transaction.ticker_name }}
    </li>
  </ol>
</nav>
...
このようにhtmlごとにべた書きしてもいいのですが、ページが増えてくるとちょっと面倒そうです。
なので、base.htmlに共通テンプレートとして持たせるようにしましょう。
先ほどdetail.htmlに書いたパンくずリストのhtmlは削除します。
<!-- 削除 -->
<nav aria-label="breadcrumb">
 ...
</nav>
次にcomponents内に以下のようにbreadcrumbs.htmlを作成します。
<!-- note/templates/note/components/breadcrumbs.html -->
<nav aria-label="breadcrumb">
  <ol class="breadcrumb">
    <li class="breadcrumb-item">
      <a href="/">
        <i class="fa fa-home"></i>
        Home
      </a>
    </li>
    {% if breadcrumbs_list %}
      {% for item in breadcrumbs_list %}
        {% if forloop.last %}
          <li class="breadcrumb-item active" aria-current="page">{{ item.name }}</li>
        {% else %}
          <li class="breadcrumb-item" aria-current="page">
            <a href="{{ item.url }}">{{ item.name }}</a>
          </li>
        {% endif %}
      {% endfor %}
    {% endif %}
  </ol>
</nav>
次にbase.htmlで読み込みます。
<!-- note/templates/note/base.html -->
{% load static %}
<!doctype html>
<html lang="ja">
<head>
...
</head>
<body>
  <div class="container pt-5 pb-5">
    <!-- 追加 breadcrumbs -->
    {% include "note/components/breadcrumbs.html" %}
    {% block content %}{% endblock %}
  </div>
...
</body>
</html>
そしてパンくずリストを表示したいページのcontextを以下のようにします。
# note/views.py

class TransactionDetail(generic.DetailView):
    model = Transaction
    template_name = 'note/detail.html'

    def get_context_data(self, **kwargs):
        context = super().get_context_data(**kwargs)
        pk = self.kwargs.get('pk')
        context['breadcrumbs_list'] = [
            {'name': f'#{pk} {self.object.ticker_name}',
             'url': ''}
        ]
        return context
contextにbreadcrumbs_listという辞書のリストを渡して、名前とurlの情報を持たせます。
受け取ったテンプレート内で繰り返し処理をして、パンくずリストを生成をするという流れです。
ここの部分ですね。
    {% if breadcrumbs_list %}
      {% for item in breadcrumbs_list %}
        {% if forloop.last %}
          <li class="breadcrumb-item active" aria-current="page">{{ item.name }}</li>
        {% else %}
          <li class="breadcrumb-item" aria-current="page">
            <a href="{{ item.url }}">{{ item.name }}</a>
          </li>
        {% endif %}
      {% endfor %}
    {% endif %}
ここの記述でループ処理の最後かどうかの判定をしています。
{% if forloop.last %}最後のurlだったらアクティブページとしてページ名だけ表示、途中だったらページ名とurlをセットにして出力している、ということになります。
今回については、トップページ→詳細ページという2階層なので、breadcrumbs_listにurlの情報を持たせる必要がありませんでした。
もし3階層になる場合は以下のように相対パスで指定していくことになります。
テストをしてみましょう。
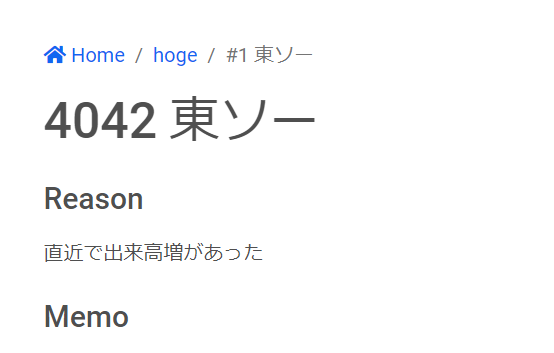
contextを以下のようにしてみます。
context['breadcrumbs_list'] = [
    {'name': 'hoge', 'url': '/hoge/'},
    {'name': f'#{pk} {self.object.ticker_name}',
     'url': ''}
]
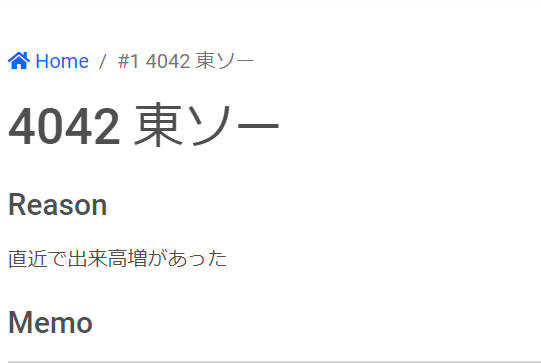
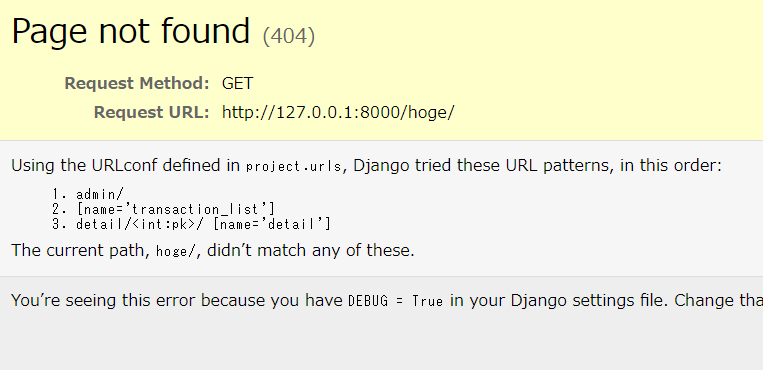
詳細ページでは以下のように表示されます。
リンクhogeをクリックするとエラーになりますが、狙い通りのurlに遷移していることが確認できます。
確認したらcontextを元の状態に戻しておきましょう。
context['breadcrumbs_list'] = [
    {'name': f'#{pk} {self.object.ticker_name}',
     'url': ''}
]
次回に詳細ページ内から、Historyモデルを追加、削除できるように処理を行っていきます。
 Share
Share