Python DjangoとMDBで作る株取引ノートシリーズの5つ目の記事です。
前回は取引詳細ページを作りました。
今回は取引詳細ページから売買履歴の追加と削除をできるようにしていきます。
URLパターン
まず、売買履歴作成用のurlパターンを用意します。
from django.urls import path
from . import views

app_name = 'note'

urlpatterns = [
    path('', views.TransactionList.as_view(), name='transaction_list'),
    path('detail/<int:pk>/', views.TransactionDetail.as_view(), name='detail'),
    path('history_create/<int:pk>/', views.HistoryCreate.as_view(), name='history_create'),  # 追加
]
今回は詳細ページから追加するので、このhistory_createは表示ページは作らないです。
詳細ページ内のフォームにこのURLを指定して、モデル追加の処理をするイメージです。
<int:pk>の部分はTransactionモデルのpkを指定して、Historyモデルのターゲットを特定するのに使います。
フォームの作成
次にforms.pyに追記をします。
# note/forms.py
from django import forms
from .models import History  # 追加

...

class HistoryCreateForm(forms.ModelForm):
    class Meta:
        model = History
        exclude = ('amount', 'target',)
        widgets = {
            'date_trade': forms.TextInput(attrs={'autocomplete': 'off',
                                                 'placeholder': 'date',
                                                 'class': 'form-control'}),
            'trading_category': forms.Select(attrs={'class': 'form-select'}),
            'price': forms.TextInput(attrs={'autocomplete': 'off',
                                                  'placeholder': 'price',
                                                  'class': 'form-control'}),
            'quantity': forms.TextInput(attrs={'autocomplete': 'off',
                                               'placeholder': 'quantity',
                                               'class': 'form-control'}),
            'commission': forms.TextInput(attrs={'autocomplete': 'off',
                                                 'placeholder': 'commission',
                                                 'class': 'form-control'}),
        }
amountを除いているのは基本的に単価と数量と手数料があれば計算できるからです。
ビューの追加
以下のように編集します。
from django.views import generic
from .models import Transaction, History  # 追加
from .forms import TransactionSearchForm, HistoryCreateForm  # 追加
from django.db.models import Q
from django.shortcuts import get_object_or_404, redirect  # 追加


...

class TransactionDetail(generic.DetailView):
    model = Transaction
    template_name = 'note/detail.html'

    def get_context_data(self, **kwargs):
        context = super().get_context_data(**kwargs)
        pk = self.kwargs.get('pk')
        context['breadcrumbs_list'] = [
            {'name': f'#{pk} {self.object.ticker_name}',
             'url': ''}
        ]
        # 追加
        context['history_create_form'] = HistoryCreateForm

        return context


class HistoryCreate(generic.CreateView):
    """
    売買履歴作成ビュー
    取引詳細ページのフォームからpkを受け取り、モデル保存処理をする
    """
    model = History
    form_class = HistoryCreateForm

    def form_valid(self, form):
        pk = self.kwargs.get('pk')
        # 対象取引モデルを取得
        transaction = get_object_or_404(Transaction, pk=pk)
        # フォームから値を受け取る
        price = float(self.request.POST.get('price'))
        quantity = int(self.request.POST.get('quantity'))
        # 手数料は空欄の場合は0
        commission = self.request.POST.get('commission')
        commission = int(commission) if commission else 0
        category = self.request.POST.get('trading_category')

        # 受渡金額の計算、購入の時は足し算、売却、配当の時は引き算
        amount = price * quantity
        if category == 'Buy':
            amount += commission
        else:
            amount -= commission

        history = form.save(commit=False)
        history.target = transaction
        history.amount = amount
        history.commission = commission
        history.save()

        return redirect('note:detail', pk=pk)
詳細ページ内でのフォームの表示
簡単なformを表示させて動作を確認してみましょう。
<!-- note/templates/note/detail.html -->
{% extends "note/base.html" %}
{% block content %}
<h1 class="mt-2">
  {{ transaction.ticker_code }} {{ transaction.ticker_name }}
</h1>
<h4 class="mt-4">Reason</h4>
<p class="mt-2">{{ transaction.reason|linebreaks }}</p>
<h4 class="mt-4">Memo</h4>
<hr>
{{ transaction.memo|linebreaks }}
<hr>
<h4 class="text-center mt-2">History</h4>
{% include "note/components/history_table.html" %}

<!-- 追加 -->
<form action="{% url 'note:history_create' transaction.pk %}" method="post">
  {% csrf_token %}
  {{ history_create_form.as_p }}
  <button type="submit" class="btn">Send</button>
</form>

{% endblock %}
form内のaction属性にhistory_createのurlを指定します。
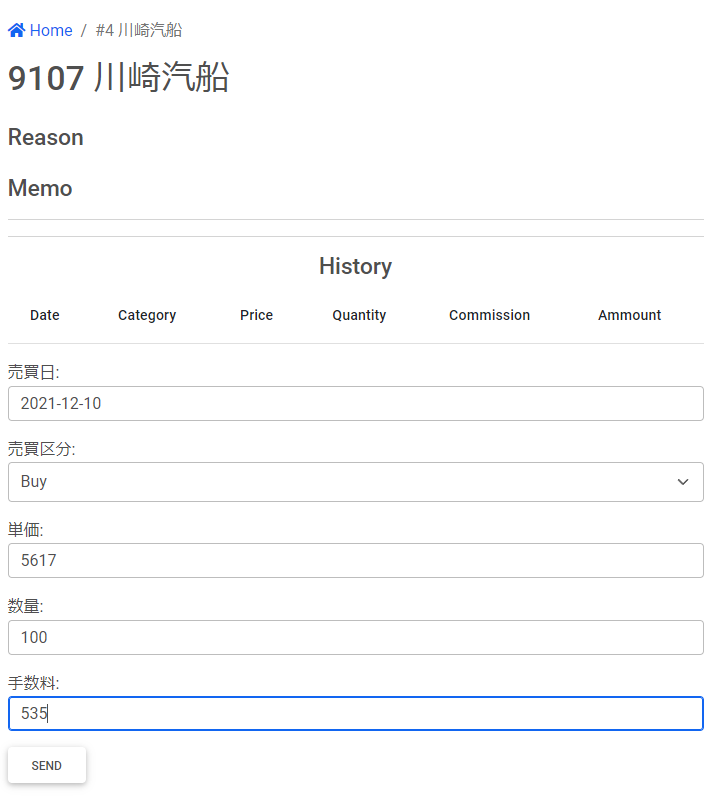
上のように入力してSENDボタンを押してみます。
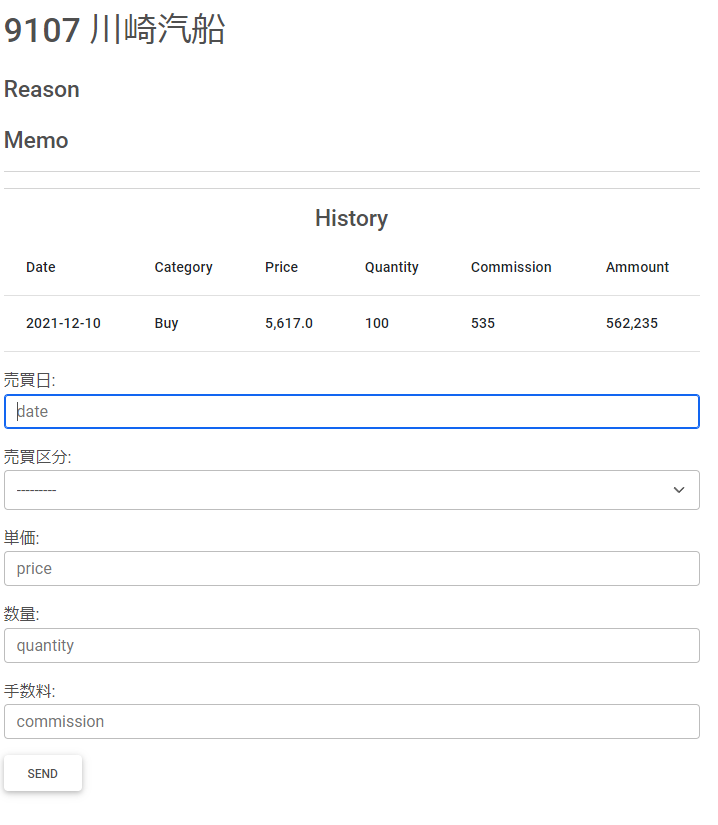
するとこのように売買履歴が追加されます。
formがsubmitされた際に/history_create/{pk}へと情報が送られます。
urlパターンには以下のように追加していました。
path('history_create/<int:pk>/', views.HistoryCreate.as_view(), name='history_create'), なので、views.pyのHistoryCreateがこのタイミングで呼び出され、受け取った値から売買履歴を作成する処理が行われます。
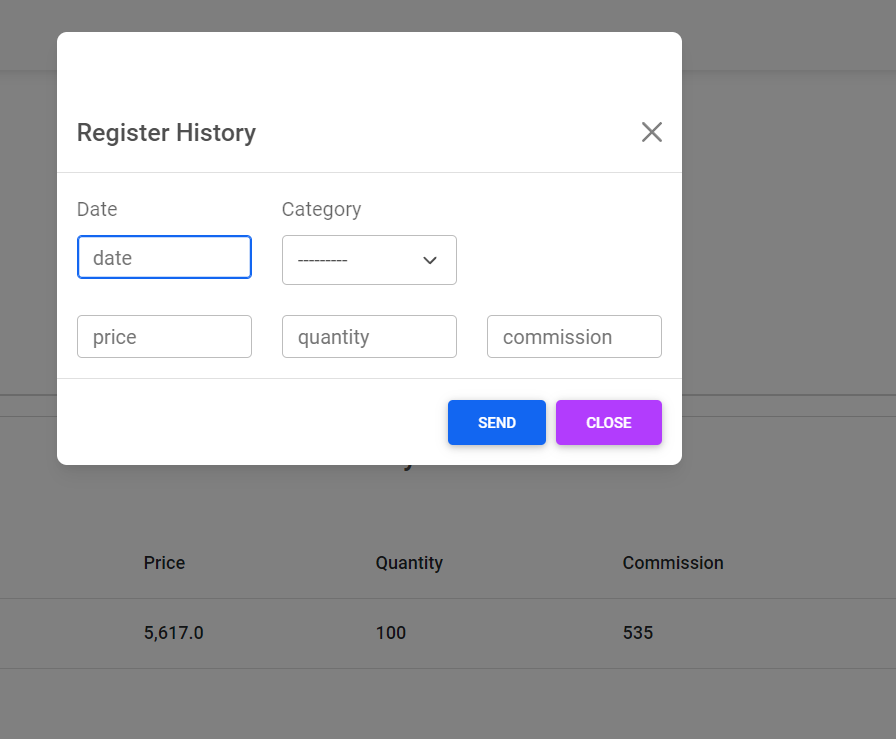
モーダルで表示する
見栄えの問題ですが、売買履歴の入力フォームはちょっとスペースを取るので、モーダルで呼び出すようにしましょう。
まず、先ほど作成したフォームは削除します。
<!-- 削除する -->
<form action="{% url 'note:history_create' transaction.pk %}" method="post">
  {% csrf_token %}
  {{ history_create_form.as_p }}
  <button type="submit" class="btn">Send</button>
</form>
次にMDBのModalを参考にcomponents内に、history_create_modal.htmlを作成します。
https://mdbootstrap.com/docs/standard/components/modal/
<!-- note/templates/note/components/history_create_modal.html -->
<div class="modal fade" id="historyCreateModal" tabindex="-1" aria-labelledby="historyCreateModalLabel" aria-hidden="true">
  <div class="modal-dialog">
    <div class="modal-content">
      <form class="mt-5" action="{% url 'note:history_create' transaction.pk %}" method="POST">
        {% csrf_token %}
        <div class="modal-header">
          <h5 class="modal-title" id="historyCreateModalLabel">Register History</h5>
          <button type="button" class="btn-close" data-mdb-dismiss="modal" aria-label="Close"></button>
        </div>
        <div class="modal-body">
          <div class="row">
            <div class="col-md-4">
              <label class="form-label" for="id_date_trade">Date</label>
              {{ history_create_form.date_trade }}
            </div>
            <div class="col-md-4">
              <label class="form-label" for="id_trading_category">Category</label>
              {{ history_create_form.trading_category }}
            </div>
          </div>
          <div class="row mt-4">
            <div class="col-md-4">
              {{ history_create_form.price }}
            </div>
            <div class="col-md-4">
              {{ history_create_form.quantity }}
            </div>
            <div class="col-md-4">
              {{ history_create_form.commission }}
            </div>
          </div>
        </div>
        <div class="modal-footer">
          <button class="btn btn-primary" type="submit" name="button">Send</button>
          <button type="button" class="btn btn-secondary" data-mdb-dismiss="modal">
            Close
          </button>
        </div>
      </form>
    </div>
  </div>
</div>
次にdetail.html内でこのモーダルを読み込みつつ、モーダルを呼び出すbuttonを追記します。
<!-- note/templates/note/detail.html -->

{% extends "note/base.html" %}
{% block content %}
<h1 class="mt-2">
  {{ transaction.ticker_code }} {{ transaction.ticker_name }}
</h1>
<h4 class="mt-4">Reason</h4>
<p class="mt-2">{{ transaction.reason|linebreaks }}</p>
<h4 class="mt-4">Memo</h4>
<hr>
{{ transaction.memo|linebreaks }}
<hr>
<h4 class="text-center mt-2">History</h4>
<!-- 追加 モーダルの呼び出しボタン -->
<button type="button" class="mt-2 btn btn-sm btn-rounded btn-primary"
data-mdb-toggle="modal"
data-mdb-target="#historyCreateModal">
  Register
</button>
{% include "note/components/history_table.html" %}
<!-- 追加 売買履歴追加モーダル -->
{% include "note/components/history_create_modal.html" %}
{% endblock %}
そうするとこのようにモーダルから登録できるようになります。
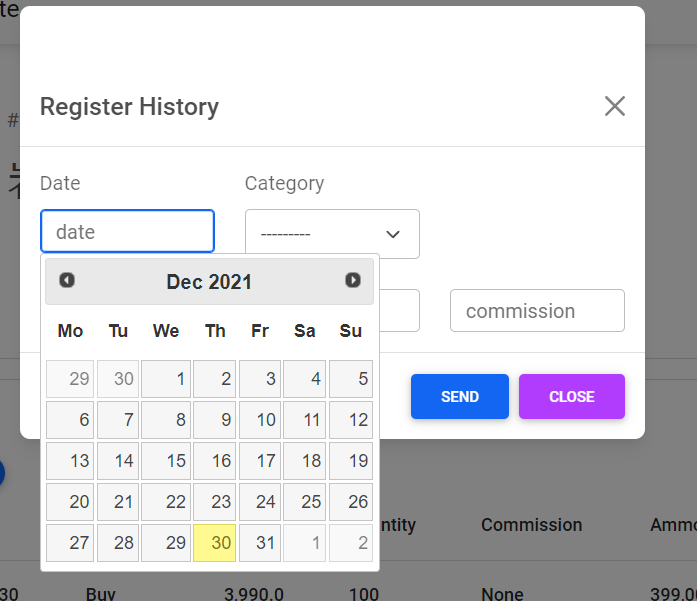
日付の入力を楽にする
日付はyyyy-mm-dd形式でべたうちするのはちょっと大変です。
MDBにはカレンダーで入力できるcomponentがありますが、無償版ですと使えないようです。
なので、JavaScriptライブラリのDatepickerを使っていきます。
detail.htmlに追記します。
<!-- note/templates/note/detail.html -->
{% extends "note/base.html" %}
{% block content %}
...
{% endblock %}
{% block extrajs %}
<!-- date picker -->
<script src="https://ajax.googleapis.com/ajax/libs/jquery/2.1.4/jquery.min.js"></script>
<link rel="stylesheet" href="https://cdnjs.cloudflare.com/ajax/libs/jqueryui/1.12.1/themes/base/jquery-ui.min.css">
<script src="https://cdnjs.cloudflare.com/ajax/libs/jqueryui/1.12.1/jquery-ui.min.js"></script>
<script type="text/javascript">
  $(function() {
    $('#id_date_trade').datepicker({
      dateFormat: 'yy-mm-dd',
      firstDay: 1,
      dayNamesMin: ["Su", "Mo", "Tu", "We", "Th", "Fr", "Sa"],
      monthNames: ["Jan", "Feb", "Mar", "Apr", "May", "Jun", "Jul", "Aug", "Sep", "Oct", "Nov", "Dec"],
    });
  })
</script>
{% endblock %}
日付を選択した際に入力カレンダーが出現します。
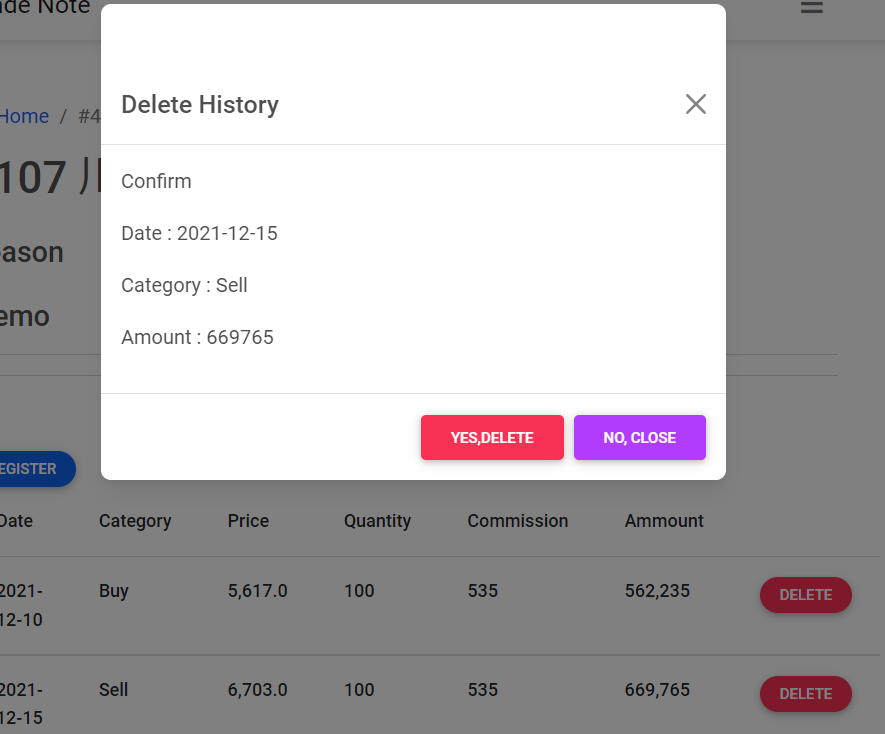
モーダルで削除もできるようにする
入力をミスしてしまったときのために削除もできるようにしておきましょう。
削除もモーダルで行っていきます。
urlのパターンを追加しましょう。
# note/urls.py

urlpatterns = [
    path('', views.TransactionList.as_view(), name='transaction_list'),
    path('detail/<int:pk>/', views.TransactionDetail.as_view(), name='detail'),
    path('history_create/<int:pk>/', views.HistoryCreate.as_view(), name='history_create'),
    path('history_delete/<int:pk>/', views.HistoryDelete.as_view(), name='history_delete'),  # 追加
]
次にviewです。
# note/views.py
...
from django.urls import reverse_lazy  # 追加

...

class HistoryDelete(generic.DeleteView):
    """売買履歴削除ビュー"""
    model = History

    def get_success_url(self):
        target_pk = self.object.target.pk
        return reverse_lazy('note:detail', kwargs={'pk': target_pk}
次にcomponents内にhistory_delete_modal.htmlを作成します。
<!-- note/templates/note/components/history_delete_modal.html -->
<div class="modal fade" id="historyDeleteModal" tabindex="-1" aria-labelledby="historyDeleteModalLabel" aria-hidden="true">
  <div class="modal-dialog">
    <div class="modal-content">
      <!-- actionは動的に設定 -->
      <form class="mt-5" id="delete-form" method="POST">
        {% csrf_token %}
        <div class="modal-header">
          <h5 class="modal-title" id="historyDeleteModalLabel">Delete History</h5>
          <button type="button" class="btn-close" data-mdb-dismiss="modal" aria-label="Close"></button>
        </div>
        <div class="modal-body">
          <p>Confirm</p>
          <!-- ここを動的に設定 -->
          <p id="delete-date"></p>
          <p id="delete-category"></p>
          <p id="delete-amount"></p>
        </div>
        <div class="modal-footer">
          <button class="btn btn-danger" type="submit" name="button">Yes,Delete</button>
          <button type="button" class="btn btn-secondary" data-mdb-dismiss="modal">
            No, Close
          </button>
        </div>
      </form>
    </div>
  </div>
</div>
作成の時と違って難しいのが、formのaction属性を動的に設定しなければいけない点です。
なので、この段階では値を設定しません。
<!-- ここを動的に設定 -->
<p id="delete-date"></p>
<p id="delete-category"></p>
<p id="delete-amount"></p>
ここはどれを削除しようとしているかを判別する最低限の情報です。
どちらもボタンが押されたタイミングで動的に値を挿入するようにしていきます。
まず、history_table.htmlを以下のようにします。
<!-- note/templates/note/components/history_table.html -->
{% load humanize %}


<table class="table">
  <thead>
    <tr>
      <th scope="col">Date</th>
      <th scope="col">Category</th>
      <th scope="col">Price</th>
      <th scope="col">Quantity</th>
      <th scope="col">Commission</th>
      <th scope="col">Ammount</th>
      <!-- 空の列を追加 -->
      <th scope="col"></th>
    </tr>
  </thead>
  <tbody>
    {% for history in transaction.history_set.all|dictsort:"date_trade"  %}
    <tr>
      <th>{{ history.date_trade|date:'Y-m-d' }}</th>
      <th>{{ history.trading_category }}</th>
      <th>{{ history.price|intcomma }}</th>
      <th>{{ history.quantity|intcomma }}</th>
      <th>{{ history.commission|intcomma }}</th>
      <th>{{ history.amount|intcomma }}</th>
      <!-- 追加 削除モーダルを呼び出すボタン-->
      <th>
        <button type="button" class="btn btn-rounded btn-sm btn-danger delete-modal-button"
        data-mdb-toggle="modal"
        data-mdb-target="#historyDeleteModal"
        data-deleteurl="{% url 'note:history_delete' history.pk %}"
        data-datetrade="{{ history.date_trade|date:'Y-m-d' }}"
        data-tradingcategory="{{ history.trading_category }}"
        data-amount="{{ history.amount }}">
        Delete
        </button>
      </th>
    </tr>
    {% endfor %}
  </tbody>
</table>
次にdetail.htmlで以下のようにします。
<!-- note/templates/note/detail.html -->


{% extends "note/base.html" %}


{% block content %}
...
{% include "note/components/history_table.html" %}

<!-- 売買履歴モーダル -->
{% include "note/components/history_create_modal.html" %}
<!-- 追加 売買履歴削除モーダル -->
{% include "note/components/history_delete_modal.html" %}
{% endblock %}
{% block extrajs %}
...
<script type="text/javascript">
  $(function() {
    $('#id_date_trade').datepicker({
      ...
    });
  })
  /* ここから追加 */

  // 削除ボタン群
  const deleteModalButtons = document.getElementsByClassName('delete-modal-button');

 // モーダル内の情報をセットする箇所
  const deleteForm = document.getElementById('delete-form');
  const deleteDate = document.getElementById('delete-date')
  const deleteCategory = document.getElementById('delete-category')
  const deleteAmount = document.getElementById('delete-amount')


  //削除ボタンが押された際にdatasetの値をセット
  for (const button of deleteModalButtons) {
    button.addEventListener('click', () => {
      deleteForm.action = button.dataset.deleteurl;
      deleteDate.textContent = `Date : ${button.dataset.datetrade}`;
      deleteCategory.textContent =`Category : ${button.dataset.tradingcategory}` ;
      deleteAmount.textContent =`Amount : ${button.dataset.amount}` ;
    });
  }
</script>
{% endblock %}
javascript部分ですが、削除ボタンが押された際にaction属性と確認情報を渡すようにしています。
history_table内の削除ボタンは以下のようになっていました。
        <button type="button" class="btn btn-rounded btn-sm btn-danger delete-modal-button"
        data-mdb-toggle="modal"
        data-mdb-target="#historyDeleteModal"
        data-deleteurl="{% url 'note:history_delete' history.pk %}"
        data-datetrade="{{ history.date_trade|date:'Y-m-d' }}"
        data-tradingcategory="{{ history.trading_category }}"
        data-amount="{{ history.amount }}">
        Delete
        </button>
このようにしていると、例えばbutton.dataset.deleteurlと記述することでdata-deleteurlの値が取り出せるようになります。
次回は取引モデルの作成と更新ページをつくります。
 Share
Share