Djangoで作る家計簿アプリ ③検索とページネーションの実装
公開日:2021-10-14 更新日:2023-06-08
Djangoで作る家計簿アプリシリーズの三つ目の記事です。
今回は前回作った支出一覧ページにページネーションと検索機能を持たせていこうと思います。
この家計簿は検索機能に力を入れていて、年月、金額、キーワード、カテゴリで絞り込めるようにしています。

※今回の実装に関してはNarito BlogさんのDjangoで、ブログを作るシリーズ①を参考にさせて頂いております。
検索フォームの実装
まずアプリ内にforms.pyを作成します。
#kakeibo/forms.py
from django import forms
from .models import PaymentCategory
from django.utils import timezone


class PaymentSearchForm(forms.Form):
    """支出検索フォーム"""

    # 年の選択肢を動的に作る
    start_year = 2019  # 家計簿の登録を始めた年
    end_year = timezone.now().year + 1  # 現在の年+1年
    years = [(year, f'{year}年') for year in reversed(range(start_year, end_year + 1))]
    years.insert(0, (0, ''))  # 空白の選択を追加
    YEAR_CHOICES = tuple(years)

    # 月の選択肢を動的に作る
    months = [(month, f'{month}月') for month in range(1, 13)]
    months.insert(0, (0, ''))
    MONTH_CHOICES = tuple(months)

    # 年の選択
    year = forms.ChoiceField(
        label='年での絞り込み',
        required=False,
        choices=YEAR_CHOICES,
        widget=forms.Select(attrs={'class': 'form'})
    )

    # 月の選択
    month = forms.ChoiceField(
        label='月での絞り込み',
        required=False,
        choices=MONTH_CHOICES,
        widget=forms.Select(attrs={'class': 'form'})
    )

    # 〇〇円以上
    greater_than = forms.IntegerField(
        label='Greater Than',
        required=False,
        widget=forms.TextInput(attrs={'class': 'form',
                                      'autocomplete': 'off',
                                      'placeholder': '〇〇円以上'})
    )

    # 〇〇円以下
    less_than = forms.IntegerField(
        label='Less Than',
        required=False,
        widget=forms.TextInput(attrs={'class': 'form',
                                      'autocomplete': 'off',
                                      'placeholder': '〇〇円以下'})
    )

    # キーワード
    key_word = forms.CharField(
        label='検索キーワード',
        required=False,
        widget=forms.TextInput(attrs={'class': 'form',
                                      'autocomplete': 'off',
                                      'placeholder': 'キーワード',
                                      })
    )

    # カテゴリー検索
    category = forms.ModelChoiceField(
        label='カテゴリでの絞り込み',
        required=False,
        queryset=PaymentCategory.objects.order_by('name'),
        widget=forms.Select(attrs={'class': 'form'})
    )
年の選択について、ベタ打ちで選択リストを作ってもいいのですが、そうすると年が変わるたびにソースコードを変えなければいけないので、面倒です。
なので、開始年から現在+1年で選択肢を作るようにしました。
未来の支出を登録することは基本的にないと思いますので、その場合は現在の年までを設定としてもよいでしょう。
年や月を選択せずに、他の項目のみで絞る、という場合もあるので、先頭の選択肢に空白を加えています。
次に、このフォームをviews.pyに渡していきます。
検索が実行されたときの絞り込みとテンプレートに渡す処理を追加するイメージです。
#kakeibo/views.py
from django.views import generic
from .models import Payment, PaymentCategory, Income, IncomeCategory
from .forms import PaymentSearchForm  # 追加


class PaymentList(generic.ListView):
    template_name = 'kakeibo/payment_list.html'
    model = Payment
    ordering = '-date'

    # 追加
    def get_queryset(self):
        queryset = super().get_queryset()
        self.form = form = PaymentSearchForm(self.request.GET or None)

        if form.is_valid():
            year = form.cleaned_data.get('year')
            # 何も選択されていないときは0の文字列が入るため、除外
            if year and year != '0':
                queryset = queryset.filter(date__year=year)

            # 何も選択されていないときは0の文字列が入るため、除外
            month = form.cleaned_data.get('month')
            if month and month != '0':
                queryset = queryset.filter(date__month=month)

            # 〇〇円以上の絞り込み
            greater_than = form.cleaned_data.get('greater_than')
            if greater_than:
                queryset = queryset.filter(price__gte=greater_than)

            # 〇〇円以下の絞り込み
            less_than = form.cleaned_data.get('less_than')
            if less_than:
                queryset = queryset.filter(price__lte=less_than)

            # キーワードの絞り込み
            key_word = form.cleaned_data.get('key_word')
            if key_word:
                # 空欄で区切り、順番に絞る、and検索
                if key_word:
                    for word in key_word.split():
                        queryset = queryset.filter(description__icontains=word)

            # カテゴリでの絞り込み
            category = form.cleaned_data.get('category')
            if category:
                queryset = queryset.filter(category=category)

        return queryset

    def get_context_data(self, **kwargs):
        context = super().get_context_data(**kwargs)
        # search formを渡す
        context['search_form'] = self.form

        return context
日付に関してはmodel定義の際にDatefieldを定義しておりましたので、"date__year"や"date__month"とすることでフィルタリングが行えます。
金額部分はIntegerFieldでした。
これらは"price__gte"、"price__lte"とすることで、以上、以下でフィルタリングが行えます。
次にテンプレートに検索フォームを組み込みましょう。
<!-- kakeibo/templates/kakeibo/payment_list.html -->
{% extends 'kakeibo/base.html' %}
{% load humanize %}
{% block content %}

<!-- 検索フォーム -->
<form class="mt-2" id="search-form" action="" method="GET">
  <div>
    <label class="label mr-4">年月</label>
    {{ search_form.year }}
    {{ search_form.month }}
  </div>
  <div class="mt-4">
    <label class="label mr-4">金額</label>
    {{ search_form.greater_than }}
    <span class="ml-4 mr-4">~</span>
    {{ search_form.less_than }}
  </div>
  <div class="mt-4">
    {{ search_form.key_word }}
    <button class="btn btn-info ml-4" type="submit">検索</button>
  </div>
  <div class="mt-2 inline">
    {{ search_form.category }}
  </div>
</form>

<!-- 一覧表示 -->
<table class="table mt-3">
  ...
</table>

<!-- ページネーション -->
<div class="mt-5">
  <h1>ページネーション!</h1>
</div>


{% endblock %}
styleも追加します。
/* kakeibo/static/kakeibo/css/style.css */
...
/* --------------------------------
 * フォーム
 * -------------------------------- */
.form {
  font-size: 1.4rem;
  padding: 3px 6px;
  box-sizing: border-box;
  border-radius: 4px;
  border: solid 1px #ccc;
  background-color: #fff;
  font-family: "Ubuntu", "Noto Sans JP", sans-serif;
}

.form:focus {
  outline: 0;
  box-shadow: 0 0 0 .25rem rgba(18, 102, 241, .25);
}

/* --------------------------------
 * ボタン
 * -------------------------------- */
.btn, a.btn {
  font-size: 1.4rem;
  color: #333;
  -webkit-appearance: none;
  padding: 4px 16px;
  line-height: 1.3;
  border-radius: 4px;
  border: solid 1px #ccc;
  background-color: #fff;
  vertical-align: bottom;
  font-family: "Ubuntu", "Noto Sans JP", sans-serif;
  display: inline-block;
  text-align: center;
  cursor: pointer;
}

.btn:hover, a.btn:hover {
  opacity: 0.5;
}

.btn-info, a.btn-info {
  background-color: #39c0ed;
  color: #fff;
}
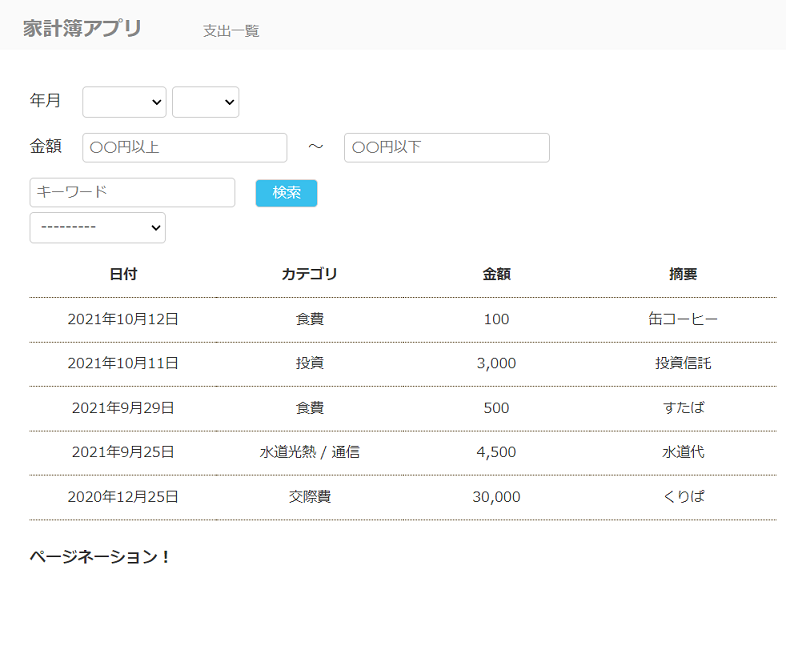
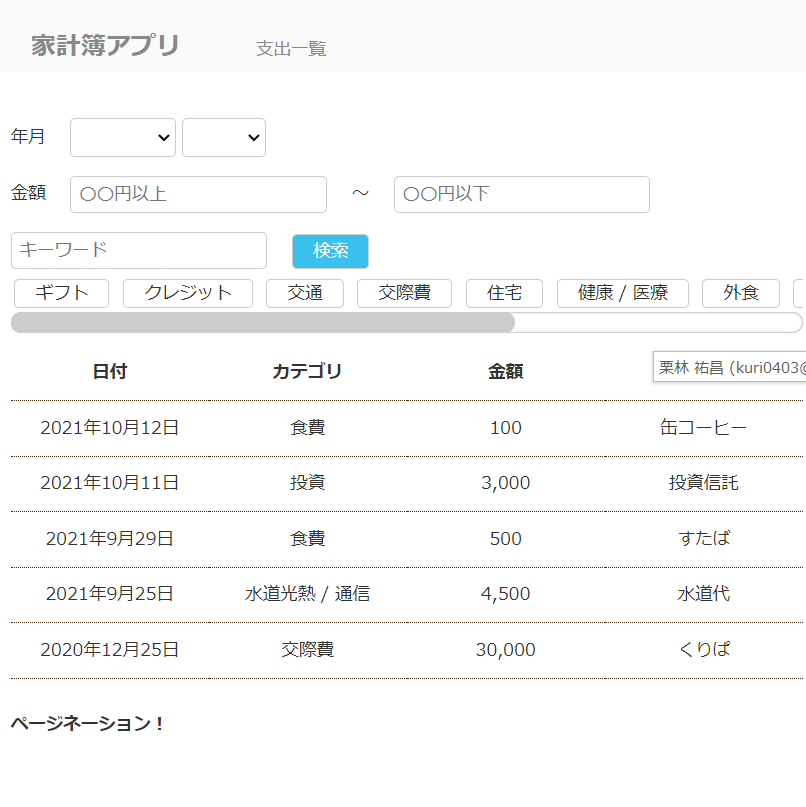
良い感じの見た目になってきましたね。
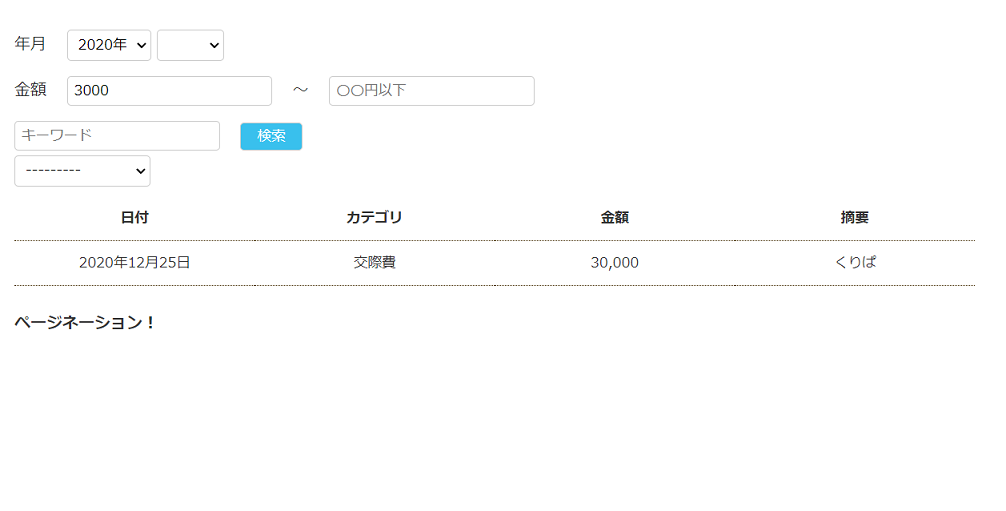
3000円以上で検索してみましょう。

さらに2020年で絞り込みをかけてみます。
このように複数条件で絞り込みが行えます。
カテゴリ選択をもっと便利にする
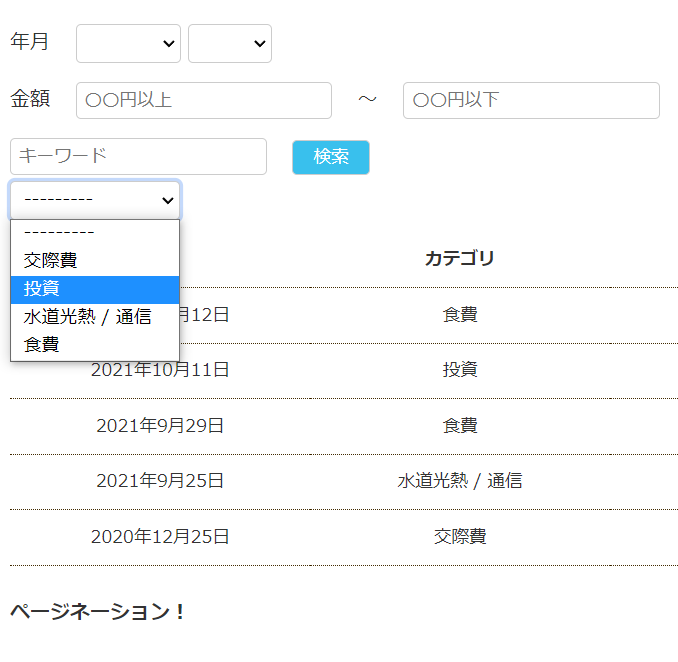
現在カテゴリの部分はこのようなセレクトボックスとなっています。
場合にもよりますが、セレクトボックスはクリックする→選択肢を確認する→選択をする、という3動作が必要なので、ちょっと時間がかかります。
ここをもうちょっと直感的に、カスタムラジオボタンを定義して選択できるようにしていきます。
まずアプリ内にwidgets.pyを作成して、カスタムウィジェットを定義します。
#kakeibo/widgets.py
from django import forms


class CustomRadioSelect(forms.RadioSelect):
    template_name = 'kakeibo/widgets/custom_radio.html'
    option_template_name = 'kakeibo/widgets/custom_radio_option.html'

    def __init__(self, attrs=None):
        super().__init__(attrs)
        if 'class' in self.attrs:
            self.attrs['class'] += ' custom-radio'
        else:
            self.attrs['class'] = 'custom-radio'
次にtemplates/kakeibo内にwidgetsディレクトリを作りカスタムテンプレートを用意します。
<!-- kakeibo/templates/kakeibo/widgets/custom_radio.html -->
{% for group, options, index in widget.optgroups %}
  {% for option in options %}
    {% include option.template_name with widget=option %}
  {% endfor %}
{% endfor %}
<!-- kakeibo/templates/kakeibo/widgets/custom_radio_options.html -->
{% include "django/forms/widgets/input.html" %}
<label for="{{ widget.attrs.id }}" class="custom-radio-label">{{ widget.label }}</label>
Djangoの公式ページに書かれているのですが、通常のラジオボタンをformで指定しますと、
<ul>
  <li><input type="radio" name="..."></li>
  ...
</ul>
このようにulタグやliタグが入ってしまいます。
デザイン的な調整が難しいので、これらを除いたものをカスタムテンプレートとして定義しているようなイメージです。
次にforms.pyで定義したカスタムwidgetをあてていきます。
#kakeibo/forms.py
...
from .widgets import CustomRadioSelect # add

...
class PaymentSearchForm(forms.Form):
    """支出検索フォーム"""
    ...
    # カテゴリー検索
    category = forms.ModelChoiceField(
        label='カテゴリでの絞り込み',
        required=False,
        queryset=PaymentCategory.objects.order_by('name'),
        widget=CustomRadioSelect # 変更
    )
そうするとこのような見た目になります。
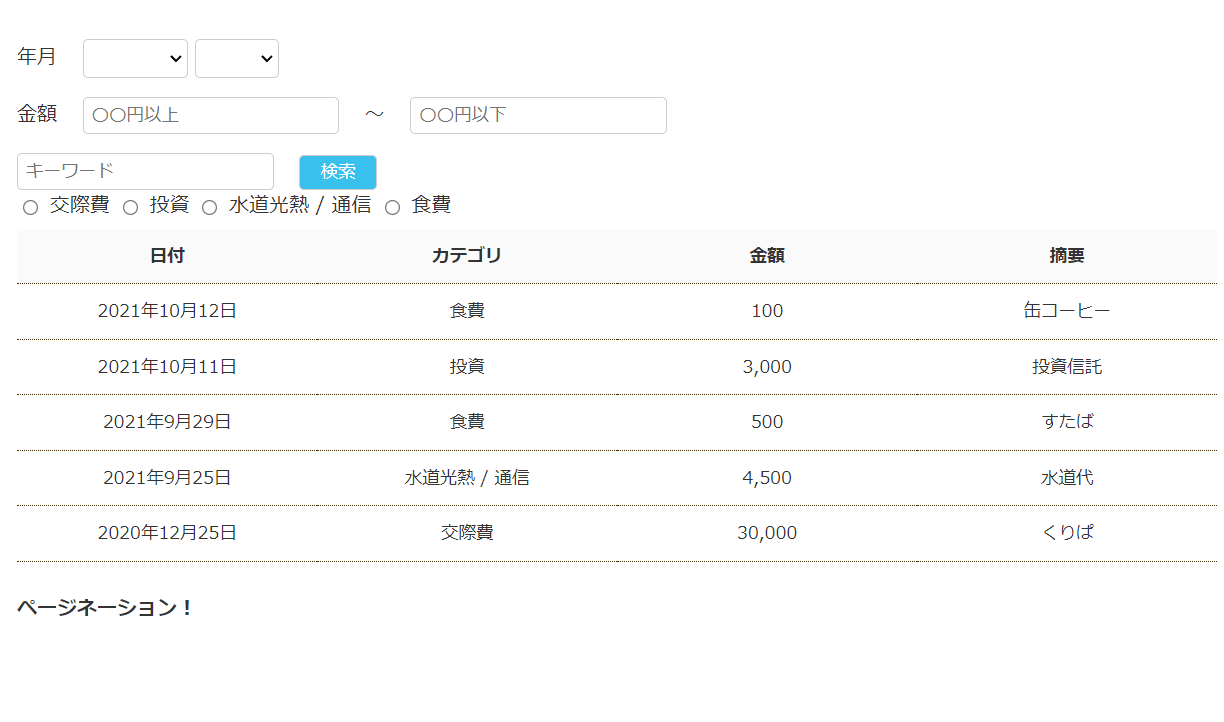
radioボタンが並ぶようになりました。
次にstyleを適用してお洒落にしましょう。
/* kakeibo/static/kakeibo/css/style.css */

...

/* --------------------------------
 * カスタム検索
 * -------------------------------- */
.inline {
  margin: 10px 0;
  overflow-x: auto;
  white-space: nowrap;
  -webkit-overflow-scrolling: touch;
  padding: 0;
}

.inline::-webkit-scrollbar {
  width: 5px;
}

.inline::-webkit-scrollbar-track {
  background: #fff;
  border: none;
  border-radius: 10px;
  box-shadow: inset 0 0 2px #777;
}

.inline::-webkit-scrollbar-thumb {
  background: #ccc;
  border-radius: 10px;
  box-shadow: none;
}

.custom-radio {
  display: none;
}

.custom-radio:checked+.custom-radio-label {
  background: #00809d;
  color: #fff;
}

.custom-radio-label {
  box-sizing: border-box;
  display: inline-block;
  border-radius: 4px;
  text-align: center;
  text-decoration: none;
  border: solid 1px #ccc;
  transition: 0.25s;
  padding: 4px 16px;
  cursor: pointer;
  font-size: 14px;
  margin: 3px;
}

.custom-radio-label:hover {
  opacity: 0.5;
}
ページ上のhtmlはこのように表示されています。
<div class="mt-2 inline-checkbox">
    <input type="radio" name="category" value="6" class="custom-radio" id="id_category_0">
    <label for="id_category_0" class="custom-radio-label">交際費</label>
    ...
</div>
inlineクラスではカテゴリーが増えた時に備えて、ページをはみ出す場合はスクロールバーを出現させるようにしています。
input type="radio"の部分はラジオボタンのまるポチですね。
ここをcssで非表示にして、ラベルのみ表示させるようなイメージです。
ラベルはcssでボタン風に装飾しています。
いくつかカテゴリーを追加するとこのようになります。
セレクトボックスで選ぶところから大分直感的になってきたと思います。
クリックで検索が実行されるようにする
現状では検索ボタンを押さないと検索が実行されません。
せっかくカテゴリーをボタン風にしたので、クリックと同時に検索されるようにしましょう。
payment_list.htmlにJavaScriptsを追記をします。
<!-- kakeibo/templates/kakeibo/payment_list.html -->
{% extends 'kakeibo/base.html' %}
{% block content %}
...
{% endblock %}

<!-- 追加 -->
{% block extrajs %}
<script type="text/javascript">
  document.addEventListener('DOMContentLoaded', e => {
    const searchForm = document.getElementById('search-form');

    //カテゴリがクリックされたら検索実行
    for (const check of document.getElementsByName('category')) {
      check.addEventListener('change', () => {
        searchForm.submit();
      });
    }

    // 選択済みのカテゴリがクリックされたらチェックを解除して検索実行
    const selectedCategory = document.querySelector(`input[name='category']:checked`)
    if (selectedCategory) {
      selectedCategory.onclick = () => {
        selectedCategory.checked = false
        searchForm.submit();
      }
    }
  });
</script>
{% endblock %}
これでカテゴリラベルがクリックされたら即検索が実行され、カテゴリごとに絞り込みがされるようになります。
細かいところですが、ラジオボタンはデフォルトでは再クリックしても解除ができないです。
なので、チェック済みのものをクリックしたらチェックを解除して送信をできるようにしています。
ページネーションの実装
最後にページネーションを実装していきます。
家計簿の支出のデータは大量に入力されることが想定されるので、ページ送りをできるようにしましょう。
views.pyを以下のようにします。
#kakeibo/views.py
...省略

class PaymentList(generic.ListView):
    template_name = 'kakeibo/payment_list.html'
    model = Payment
    ordering = '-date'
    # add
    paginate_by = 10
...
このように指定するだけで10件ずつ表示されるようになります。
何もなければこのまま進めばいいのですが、検索パラメーターがあるのでひと手間加える必要があります。
アプリ内にtemplatetagsディレクトリを作りkakeibo.pyを作成します。
#kakeibo/templatetags/kakeibo.py
from django import template

register = template.Library()

@register.simple_tag
def url_replace(request, field, value):
    """
    GETパラメータの一部を置き換える。
    """
    url_dict = request.GET.copy()
    url_dict[field] = str(value)
    return url_dict.urlencode()
ページャーのリンクを設定する際に、検索が実行された状態でしたら、検索クエリを伴ってページ送りをするようなイメージです。
次にpayment_list.htmlのページネーション部分を以下のように変更しましょう。
generic.ListViewは特別な記述をせずに、以下のようにすることでページネーションを実装できます。
ついでに検索結果数も表示するようにします。
<!-- kakeibo/templates/kakeibo/payment_list.html -->
{% extends 'kakeibo/base.html' %}
{% load humanize %}
{% load kakeibo %} <!--追加 -->
{% block content %}

<!-- 検索フォーム -->
<form class="mt-2" id="search-form" action="" method="GET">
 ...
</form>

<!-- 追加 表示件数 -->
<p class="search-result mt-3"> {{ page_obj.paginator.count }}件の検索結果 </p>

<!-- 一覧表示 -->
<table class="table mt-3">
  ...
</table>


<!-- ページネーション -->
<div class="mt-5">
  <!-- 1つ前 -->
  {% if page_obj.has_previous %}
  <a class="mr-2 prev" href="?{% url_replace request 'page' page_obj.previous_page_number %}" title="前ページへ">前へ</a>
  {% endif %}

  <!-- nページ目/トータルページ数 -->
  <span style="color:#0d1a3c">{{ page_obj.number }} / {{ page_obj.paginator.num_pages }}</span>

  <!-- 1つ後 -->
  {% if page_obj.has_next %}
  <a class="ml-2 next" href="?{% url_replace request 'page' page_obj.next_page_number %}" title="次ページへ">次へ</a>
  {% endif %}
</div>

{% endblock %}
...
styleも追記します。
/* --------------------------------
 * ページネーション・検索件数
 * -------------------------------- */
.search-result {
  color: #39c0ed;
}

.prev, .next {
  font-weight: bold;
}
この辺りは件数が多くないとイメージが付きづらいと思いますので、私の家計簿データを突っ込んでみました。
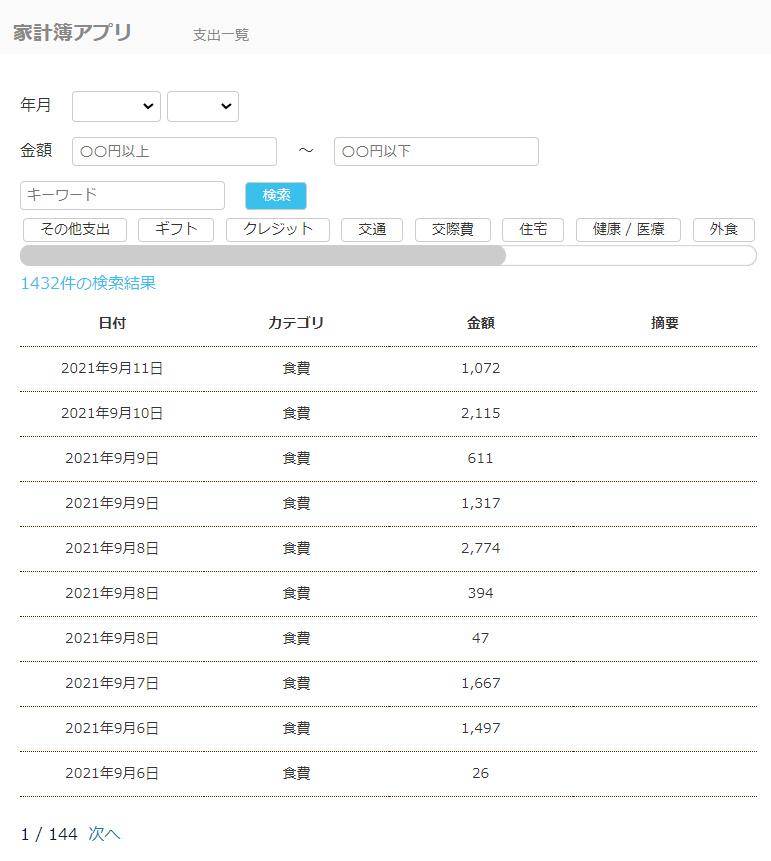
全体では1,432件の登録がありました。

外食でカテゴリを絞り込むと、42件ヒットしました。
ページャーの部分も結果に応じて5ページまでの表示になっています。
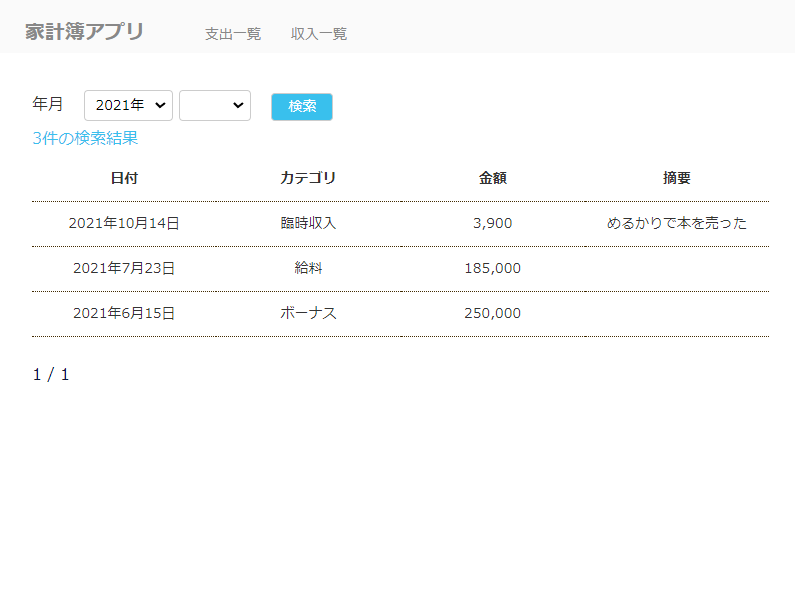
収入の一覧について
収入一覧については管理サイトで確認するだけで事足りるケースが多いと思います。
人によりますが、私の場合は月1回の給料とたまにボーナスがあるくらいです。
作るとしたら、支出と収入のモデル構造はほぼ一緒にしているので、支出のコードをコピペしていくと同じようなものができます。
ざっくりと、年月だけの検索で実装してみましょう。
#kakeibo/urls.py
...
urlpatterns = [
    path('', views.PaymentList.as_view(), name='payment_list'),
    path('income_list/', views.IncomeList.as_view(), name='income_list') # add
]
<!-- kakeibo/templates/kakeibo/base.html -->
...
<body>
  <header class="page-header">
    <h1>
      <a href="{% url 'kakeibo:payment_list' %}" class="header-title">家計簿アプリ</a>
    </h1>
    <nav class="nav">
      <ul class="main-nav ml-5">
        <li class="ml-5">
          <a href="{% url 'kakeibo:payment_list'%}">支出一覧</a>
        </li>
        <!-- 追加 -->
        <li class="ml-5">
          <a href="{% url 'kakeibo:income_list'%}">収入一覧</a>
        </li>
    </nav>
  </header>

...

</body>

</html>
#kakeibo/views.py
from django.views import generic
from .models import Payment, PaymentCategory, Income, IncomeCategory
from .forms import PaymentSearchForm, IncomeSearchForm  # 追加

...

class IncomeList(generic.ListView):
    template_name = 'kakeibo/income_list.html'
    model = Income
    ordering = '-date'
    paginate_by = 10

    def get_queryset(self):
        queryset = super().get_queryset()
        self.form = form = IncomeSearchForm(self.request.GET or None)

        if form.is_valid():
            year = form.cleaned_data.get('year')
            if year and year != '0':
                queryset = queryset.filter(date__year=year)

            month = form.cleaned_data.get('month')
            if month and month != '0':
                queryset = queryset.filter(date__month=month)

        return queryset

    def get_context_data(self, **kwargs):
        context = super().get_context_data(**kwargs)
        context['search_form'] = self.form

        return context
#kakeibo/forms.py

...

class IncomeSearchForm(forms.Form):
    start_year = 2019
    end_year = timezone.now().year + 1
    years = [(year, f'{year}年') for year in reversed(range(start_year, end_year + 1))]
    years.insert(0, (0, ''))
    YEAR_CHOICES = tuple(years)

    months = [(month, f'{month}月') for month in range(1, 13)]
    months.insert(0, (0, ''))
    MONTH_CHOICES = tuple(months)

    year = forms.ChoiceField(
        label='年での絞り込み',
        required=False,
        choices=YEAR_CHOICES,
        widget=forms.Select(attrs={'class': 'form', 'value': ''})
    )

    month = forms.ChoiceField(
        label='月での絞り込み',
        required=False,
        choices=MONTH_CHOICES,
        widget=forms.Select(attrs={'class': 'form'})
    )
<!-- kakeibo/templates/kakeibo/income_list.html -->
{% extends 'kakeibo/base.html' %}
{% load humanize %}
{% load kakeibo %}
{% block content %}

<form class="mt-2" id="search-form" action="" method="GET">
  <label class="label mr-4">年月</label>
  {{ search_form.year }}
  {{ search_form.month }}
  <button class="btn btn-info ml-4" type="submit">検索</button>
</form>

<p class="search-result mt-3"> {{ page_obj.paginator.count }}件の検索結果 </p>

<table class="table mt-3">
  <tr>
    <th>日付</th>
    <th>カテゴリ</th>
    <th>金額</th>
    <th>摘要</th>
  </tr>
  {% for income in income_list %}

  <tr>
    <td>{{ income.date }}</td>
    <td>{{ income.category }}</td>
    <td>{{ income.price|intcomma}}</td>
    <td>
      {% if income.description %}
      {{ income.description }}
      {% endif %}
    </td>
  </tr>
  {% endfor %}
</table>

<div class="mt-5">
  {% if page_obj.has_previous %}
  <a class="mr-2 font-weight-bold" href="?{% url_replace request 'page' page_obj.previous_page_number %}" title="前ページへ">前へ</a>
  {% endif %}

  <span style="color:#0d1a3c">{{ page_obj.number }} / {{ page_obj.paginator.num_pages }}</span>

  {% if page_obj.has_next %}
  <a class="ml-2 font-weight-bold" href="?{% url_replace request 'page' page_obj.next_page_number %}" title="次ページへ">次へ</a>
  {% endif %}
</div>

{% endblock %}
支出に比べるとシンプルな画面になります。
おわりに
次回は簡単な収入と支出の登録と編集、削除ページを実装する予定です。
 Share
Share